Bolted joints are everywhere, from cars and machines to buildings and bridges. But bolts don’t just hold things in place. They carry load, stretch under tension, and can even fail. So, when we simulate them, we need to do it right.
Abaqus gives us several ways to model bolts, especially when it comes to preload. Preload is the force that holds parts together after tightening a bolt. It affects joint behavior, stiffness, and the chances of separation or failure. Ignoring it in simulation can lead to inaccurate results.
In this blog, we explore how to apply Abaqus bolt load. We’ll look at different modeling methods from simple tie constraints to detailed solid bolt modeling. You’ll also learn how to apply preload using force or shrinkage, and when to use each approach. This guide helps you simulate bolt behavior more accurately in your Abaqus bolt connections.
A Quick Overview of Bolt and Abaqus Bolt Modeling
Bolted joints are everywhere, in buildings, cars, machines, and bridges. They connect parts. They hold things together. But they don’t just sit there. They carry loads. They stretch. Sometimes they even fail.
That’s why bolt modeling matters. In real life, bolts must resist forces like pulling, shearing, or twisting. In simulation, we must represent this behavior carefully. If we oversimplify, our results may mislead us. This is where Abaqus bolt load comes into play.
In Abaqus, we can simulate bolts in several ways. We can apply preload to mimic tightening. We can define how the bolt interacts with the plates around it. We can even model the bolt as a full 3D part or as a simplified connector. Each approach fits a different goal.

Figure 1: An example of bolt connection [Ref]
Why does bolt simulation matter?
- Bolts affect the stiffness of the joint.
- They control how load transfers from one part to another.
- In some cases, like fatigue, bolts can fail over time even if loads seem small.
So, understanding Abaqus bolt connection methods helps us model reality better. Whether you’re analyzing a steel frame or a car suspension, simulating bolts the right way makes a difference.
What is Bolt Pretension (Preload)?
When we tighten a bolt in real life, we stretch it. This stretching creates a force that holds the connected parts together. That force is called pretension or preload.
- Example:
Let’s say you’re changing a car tire. You put the wrench on a wheel bolt, then use your leg to push it down hard. You might hear a sharp sound as the bolt stretches slightly. That noise isn’t the bolt breaking; it’s the sound of tension building inside the bolt as it stretches and tightens. What you’re doing here is applying preload. You’re pulling the bolt, creating internal force that clamps the wheel to the hub. This force helps keep the wheel secure while driving.

Figure 2: A bolt before and after applying pretension (preload)
Why Apply Preload?
When you tighten a bolt, you stretch it. This stretch creates tensile force in the bolt, which pulls the connected parts together. At the same time, it creates a clamping force that holds the plates in firm contact. This is preload.
Preload acts like an internal grip. It keeps the joint tight. Even when external loads try to separate the plates, the preload must be overcome first. That means the bolt can resist more before opening or sliding happens. That’s why preload matters.
In simulation, applying Abaqus bolt load recreates this important effect. Without it, your Abaqus bolt connection may act too soft, or separate too soon, leading to wrong stress or failure predictions.
How to Specify Bolt Preload?
The preload is usually calculated using Torque-Based Formula.
If the bolt is tightened with a torque wrench, use:
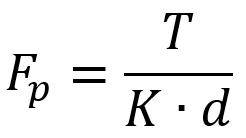
Where:
- Fp is preload force (N)
- T is tightening torque (N·m)
- K is torque coefficient (~0.2 to 0.3, depending on lubrication)
- d is nominal bolt diameter (m)
Material-Based Target Preload
Some standards suggest using 75%–90% of the bolt’s yield strength to avoid over-tightening.
![]()
Where:
 is the tensile stress area of the bolt
 is the yield strength of the bolt material
There are different methods for applying preload in Abaqus, which depend on the type of modeling of the bolt and bolted connections. Therefore, we will examine applying preload in Abaqus in the following sections in the modeling of bolted connections.
Common Approaches to Abaqus Bolt Connection Modeling
There’s more than one way to model a bolt in Abaqus. Your choice depends on your goal: speed, accuracy, or failure prediction. We can group bolt modeling into simplified and detailed approaches. Let’s look at each one, step by step.
Not Preloaded Bolt Modelling
This type is good when you just need to hold parts together without simulating tightening. It’s faster and easier but lacks real preload behavior.
Tie Connection
Think of this like welding two surfaces together. You use a tie constraint between the hole surfaces or plates.
- Easy and fast
- No bolt geometry needed
- No separation or preload allowed
Use it when: You don’t care about bolt force or separation, just a rigid link.
This method is often used when you’re not analyzing the bolt itself but just want to connect two parts firmly in your model. It’s great for early design stages or when you’re testing load paths in a large assembly. But keep in mind it doesn’t simulate real bolt behavior, so you can’t capture loosening, gapping, or clamping effects.
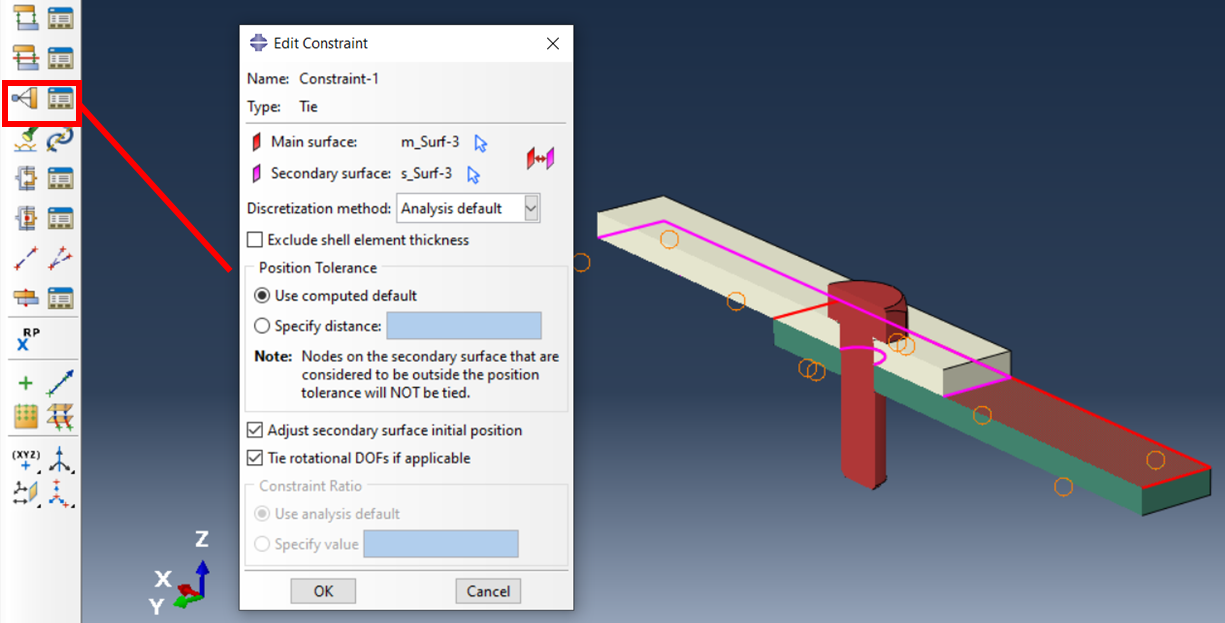
Figure 3: A sample of tie connection for joint
In the above figure, you can see that the tie constraint between plates surfaces is valid, and bolts play no role in the connection.
Rigid Beam Element Connector
This method uses an element connector to connect two reference points or surfaces across the joint.
- Connector represents bolt stiffness
- Doesn’t simulate geometry or preload
- Can transfer force and moment
This method is like placing a strong rod between parts. It can simulate the stiffness of a bolt, but it doesn’t include the contact between the bolt head, nut, and plates. It’s useful when you’re more interested in the global response of the assembly than the exact bolt stress. But again, no preload and no contact effects are captured. Generally, element connectors help us reduce simulation cost and make it easier for users by modelling simply.
For using this method, first, users must couple the holes to the control points (reference points).
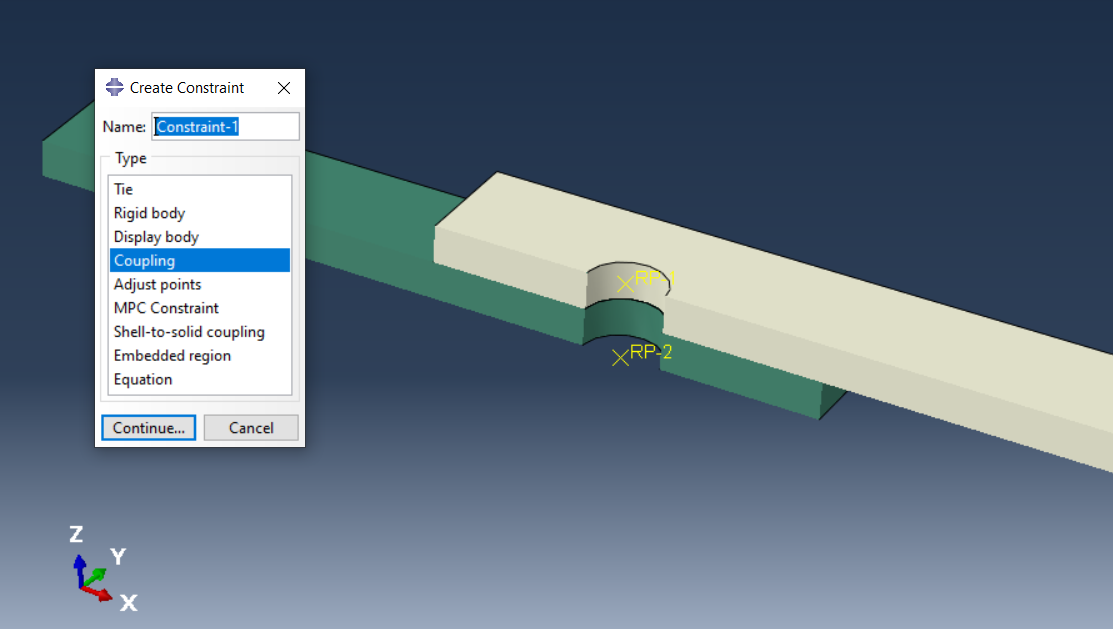
Figure 4: Coupling holes to the control points
This coupling must be kinematic coupling (RBE2); however, choosing a distribution is possible but has more computational cost.
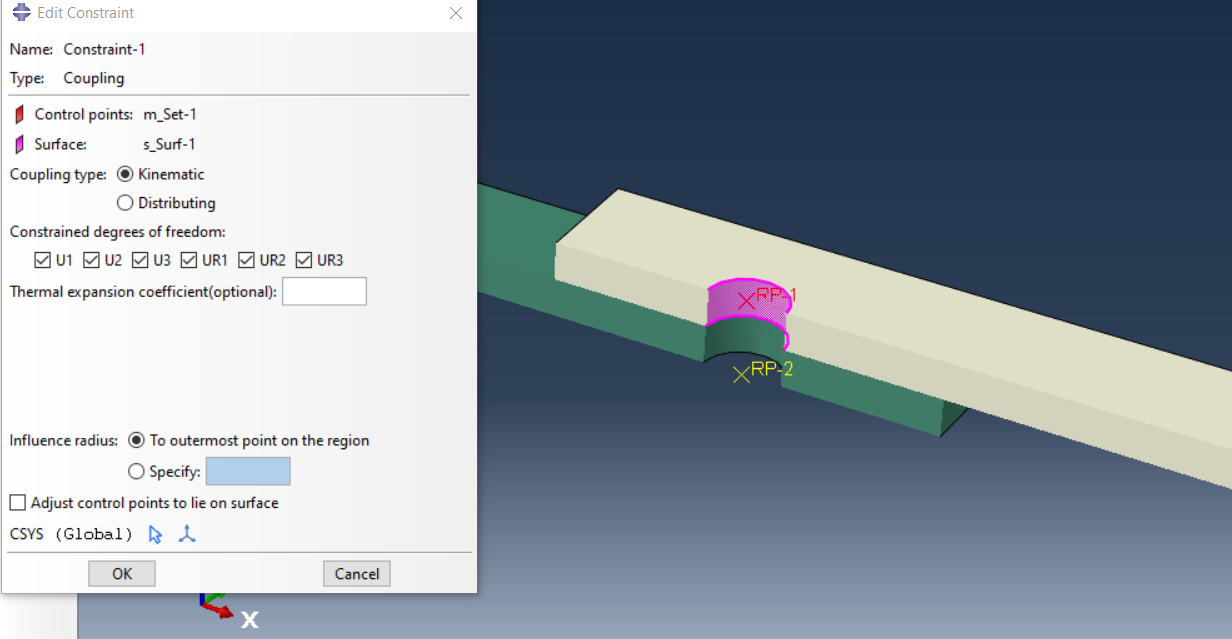
Figure 5: Kinematic coupling (RBE2)
As you can see in the next figure, now the holes are coupled to the reference points.
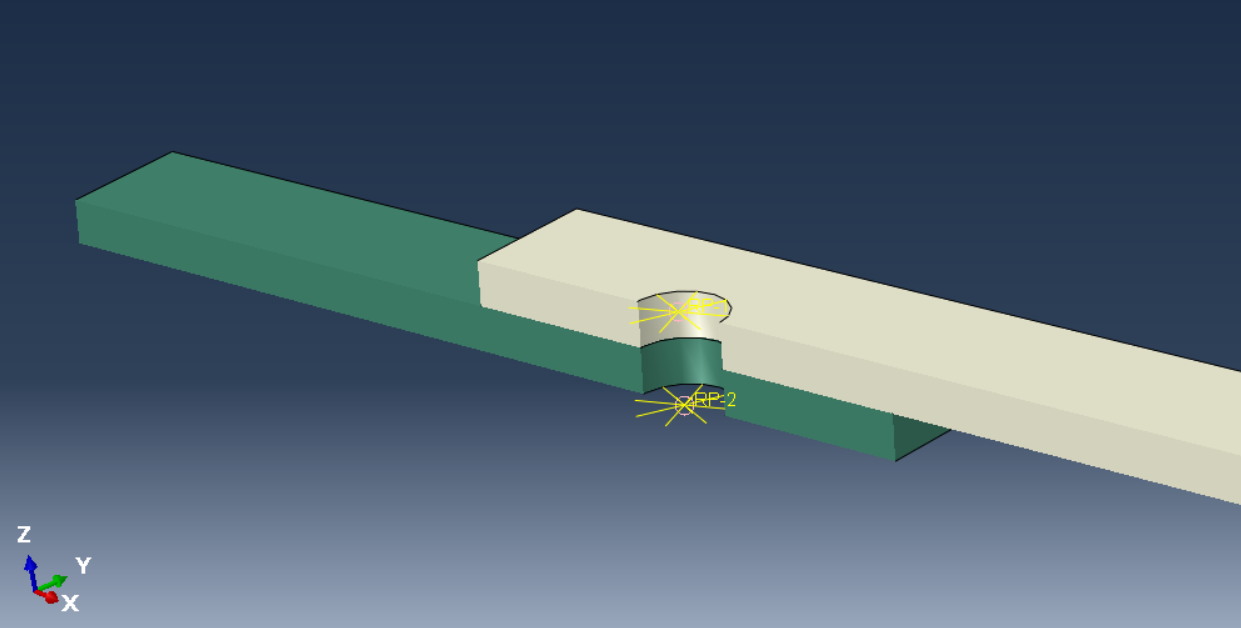
Figure 6: Cinematically Coupled holes to the reference points
In the next step in the interaction module, by using connector builder, users must build a connector between the points.
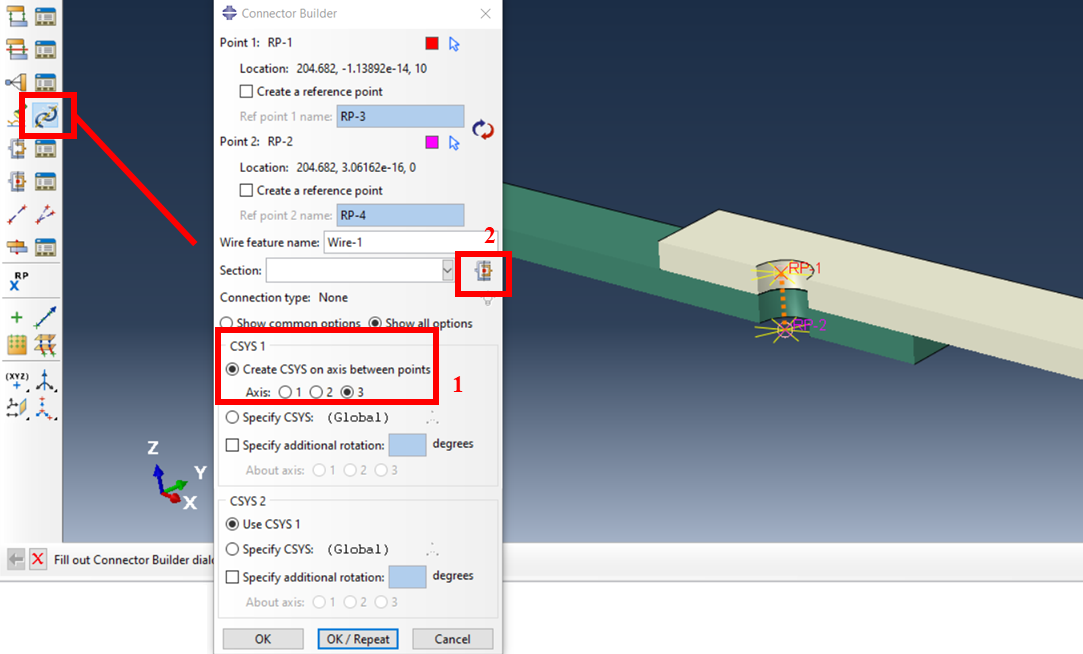
Figure 7: Building a connector between two controller points
In the above figure, first, users must create a coordinate system and choose an axis that is parallel to the connector. Secondly user must select the connector section. If it doesn’t exist, must create. In the next figure is shown the selected “connection Category” is “Assembled/Complex” and the “connection Type” is “Beam”.
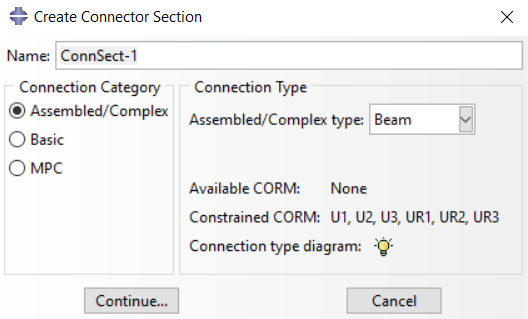
Figure 8: Create Connector Section
Finally, in the next figure, you can see there is a beam element connector between the reference points that represents a bolt connection.
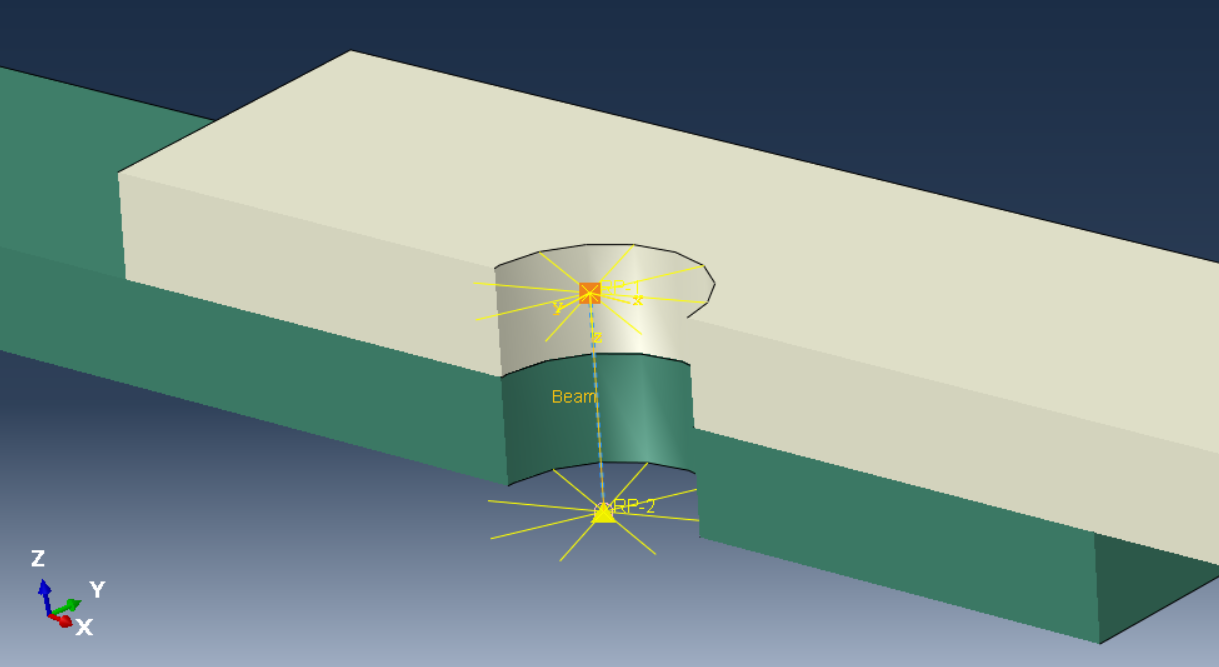
Figure 9: A beam element connector representative bolt connection
Preloaded Bolt Modelling
This is where we simulate real bolt tightening; preload, clamping, and sometimes even failure.
Translator Element Connector
This uses a connector element, like an axial translator, that acts along the bolt axis.
- Preload applied as force or length
- No detailed bolt shape
- Faster than solid bolt modeling
You can think of it as a digital spring that simulates bolt behavior. Abaqus lets you apply bolt load (either a force or an axial shrink) to simulate tightening. It captures the preload effect quite well, especially in large models. But since it doesn’t model contact with the plates, it may miss local stress concentrations and joint friction.
This method is so similar to a beam element connector. All the simulation steps are the same, except when we are creating a connector section, the connection type must be selected “translator”. This allows the model to apply preload.

Figure 10: Selecting appropriate connection type
Now, for applying preload, users need to choose connector force in the load module.
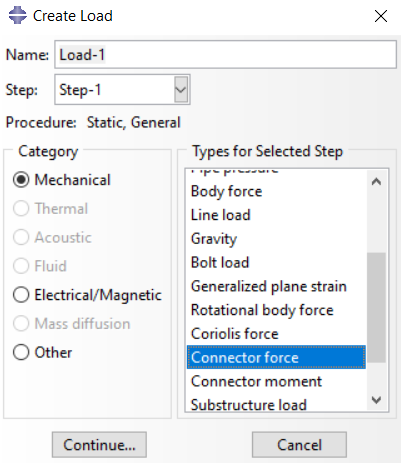
Figure 11: Selecting connector force in load module
For the final step user can import the preload value, as you can see in the next figure, to apply preload to the translator element connector.
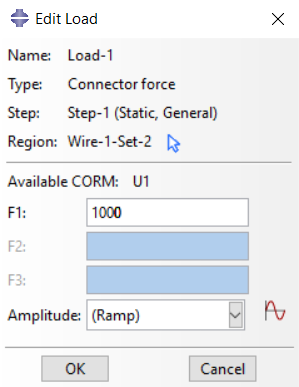
Figure 12: Applying appropriate preload to the translator element connector
Solid Bolt
This is the most detailed and realistic method. You model the entire bolt with 3D solid elements, apply Abaqus bolt load across a partitioned cross-section, and define contact at the head and nut areas.
- Includes bolt shape, preload, and contact
- Can capture failure, separation, and stress peaks
- Needs mesh and contact setup
If you’re analyzing bolt strength, local stress, or failure modes, this is the way to go. It’s slower and requires more setup, but the accuracy is worth it. It’s especially useful in dynamic studies, such as impact, where bolt failure simulation is critical.
First step to use this method after setting interaction between bolt and surfaces is applying bolt load in the load module.
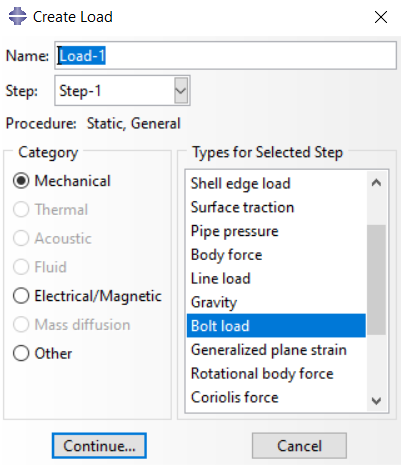
Figure 13: selecting “Bolt load” type in load module
After that, we need to select a surface from the bolt shank that bears preload. To do this, we must use the “Bolt Shank Surface” option to create a surface to load pretension.
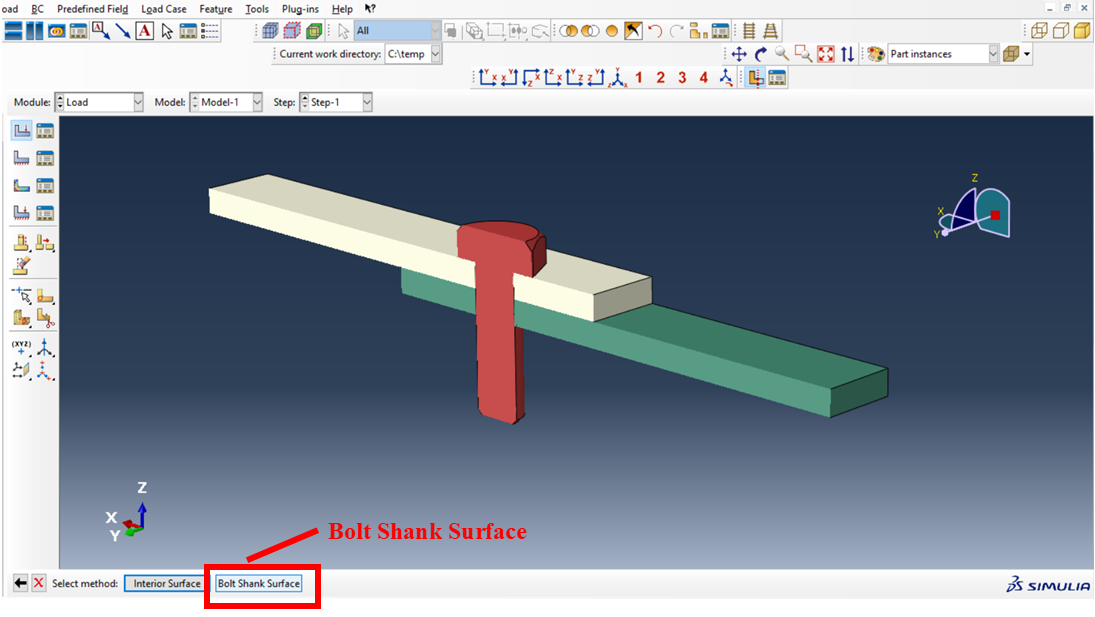
Figure 14: Creating a surface to apply preload
Now it’s time to apply the load. As you can see in the next figure, we can use two options: applying preload or adjusting length. In this step, remember to activate the “Pre-tension section at part level” option.

Figure 15: Applying bolt load in Abaqus
And finally, after these steps, you can see that preload is applied in the bolt in the next figure.
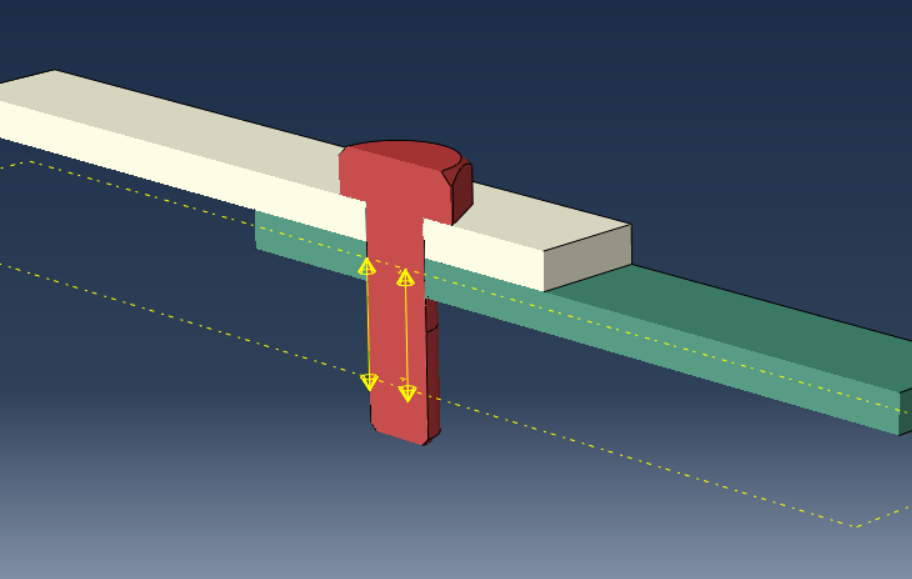
Figure 16: Preloaded bolt in Abaqus
Conclusion
This article was about modelling Abaqus bolt connections and applying Abaqus bolt preload. We discussed how bolts are represented in simulations and how to include the effect of tightening, known as preload.
Bolt preload plays a key role in joint behaviour. It affects stiffness, load transfer, and failure. Without simulating preload correctly, the model may give misleading results, especially in cases involving fatigue or separation.
We reviewed different methods to model bolts in Abaqus and Abaqus bolt loads. First, non-preloaded methods like tie connections and rigid beam connectors were explained for simple and fast setups. Then, preloaded methods such as translator connectors and solid bolt modelling were covered. These allow simulating the real clamping force and contact effects. We also explained how to calculate and apply preload.
In summary, simulating bolts correctly requires choosing the right modelling method and applying preload when needed. Abaqus offers several tools for this, and selecting the right one depends on your analysis goal.
Explore our comprehensive Abaqus tutorial page, featuring free PDF guides and detailed videos for all skill levels. Discover both free and premium packages, along with essential information to master Abaqus efficiently. Start your journey with our Abaqus tutorial now!