초보자를 위한 아바쿠스 과정 | 에프이엠 시뮬레이션 튜토리얼

기계공학과 FEM 시뮬레이션 전공 학생들을 위해 설계된 이 Abaqus 초보자 과정은 가장 널리 사용되는 분야의 다양한 예제를 제공합니다. 이러한 예제에는 시뮬레이션에 필요한 요점과 이론이 포함되어 있습니다. 이 교육 패키지를 통해 모델링, 출력 및 보고에 필요한 결과를 얻는 방법 등 다양한 ABAQUS 모듈의 기능을 익힐 수 있습니다. 이 패키지의 교과과정을 다운로드할 수 있습니다. 여기. 데모 보기
초보자를 위한 Abaqus 코스 - FEM 시뮬레이션 튜토리얼 - FEA 시뮬레이션
당신이 배울 것

Buy Together & Save

This Course 포함

강의 콘텐츠

초보자를 위한 아바쿠스 과정 | 에프이엠 시뮬레이션 튜토리얼

제품 Informations

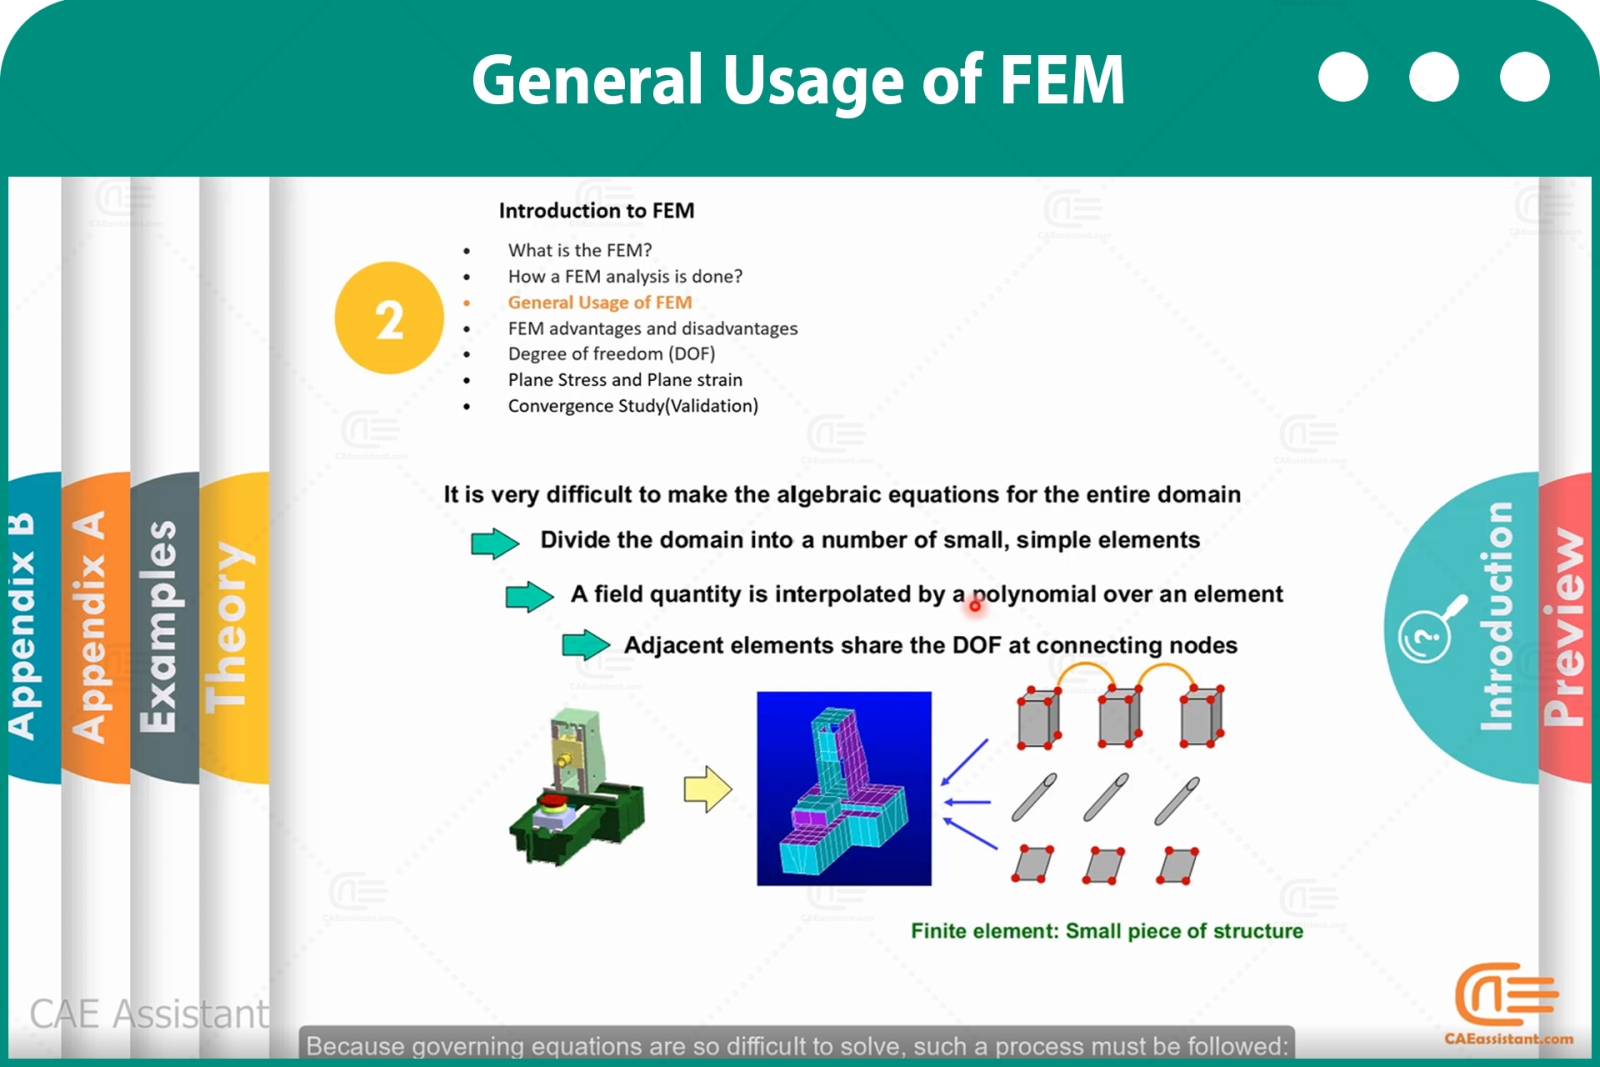
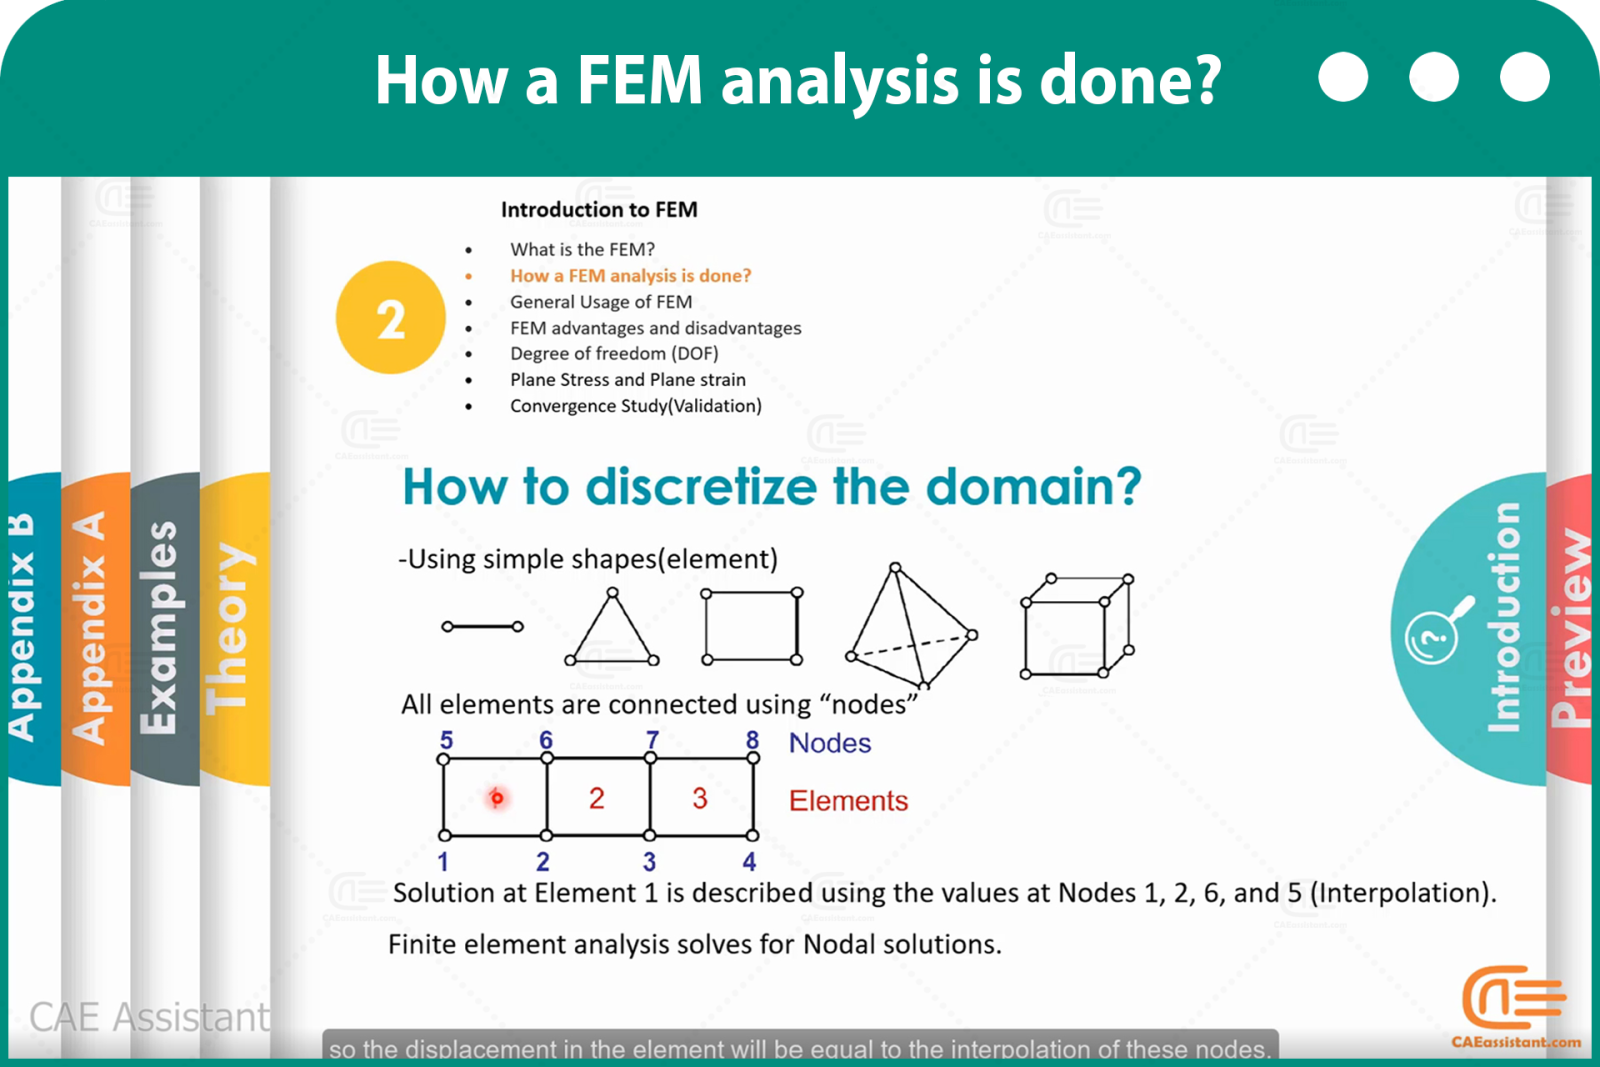
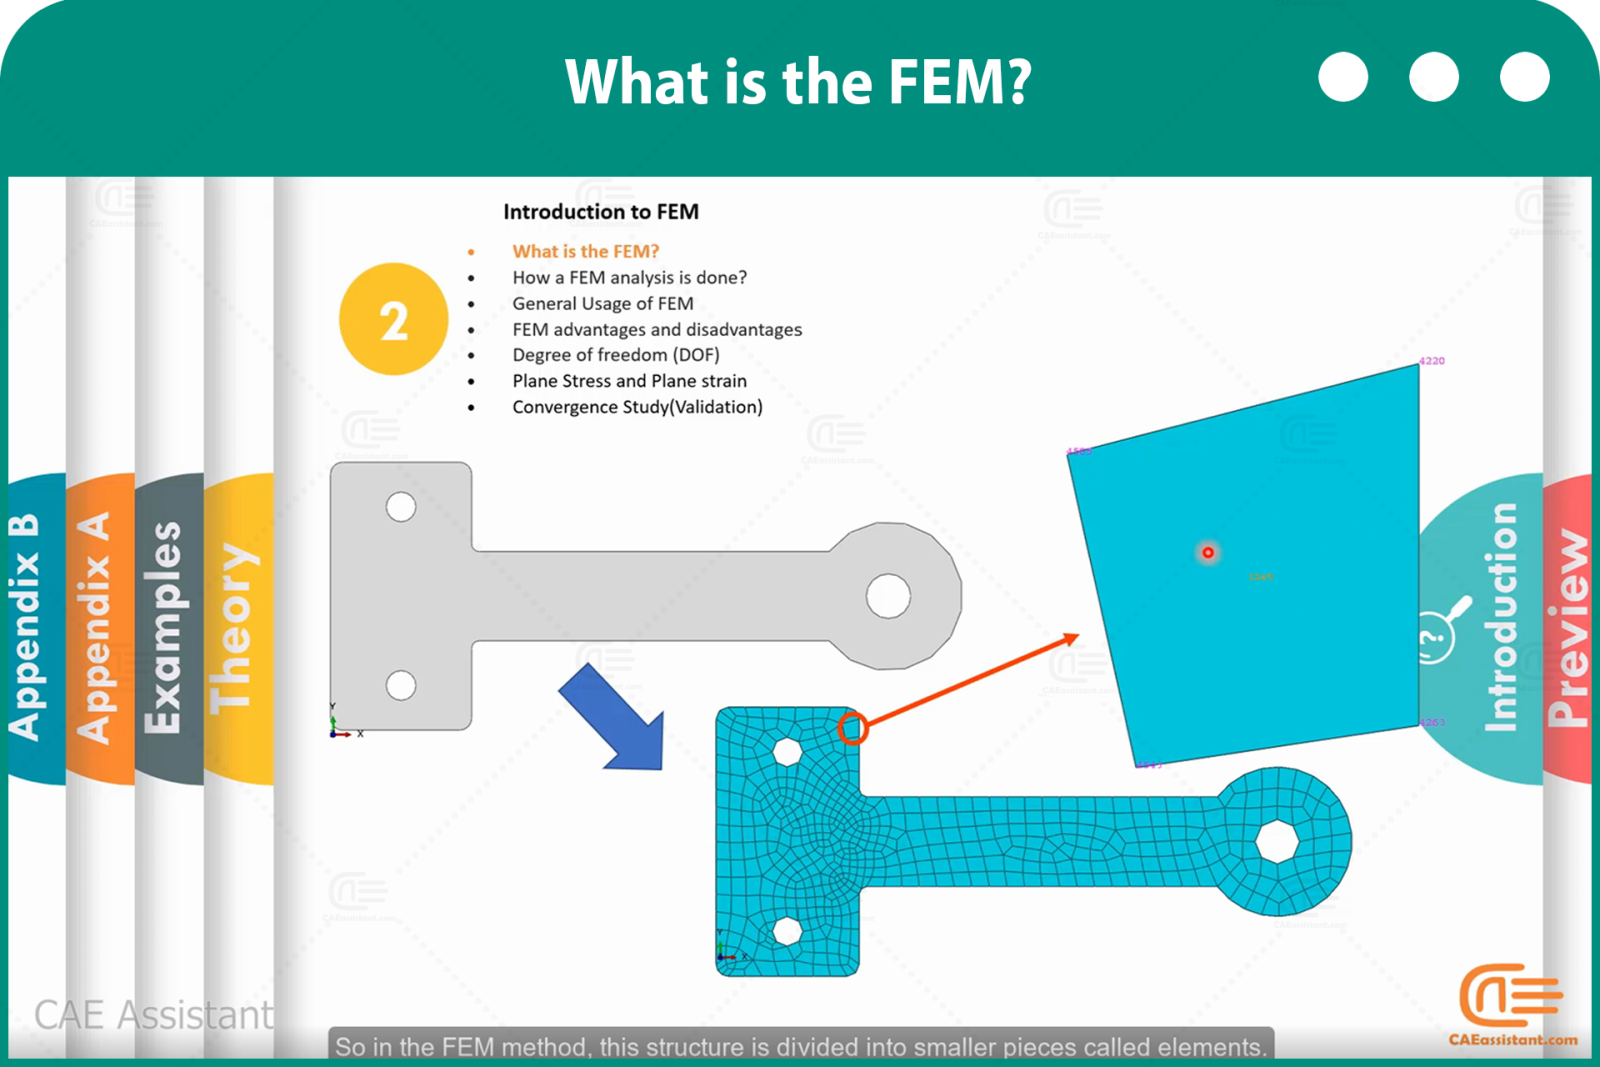
FEM 시뮬레이션 튜토리얼/ FEA 시뮬레이션 튜토리얼 설명:

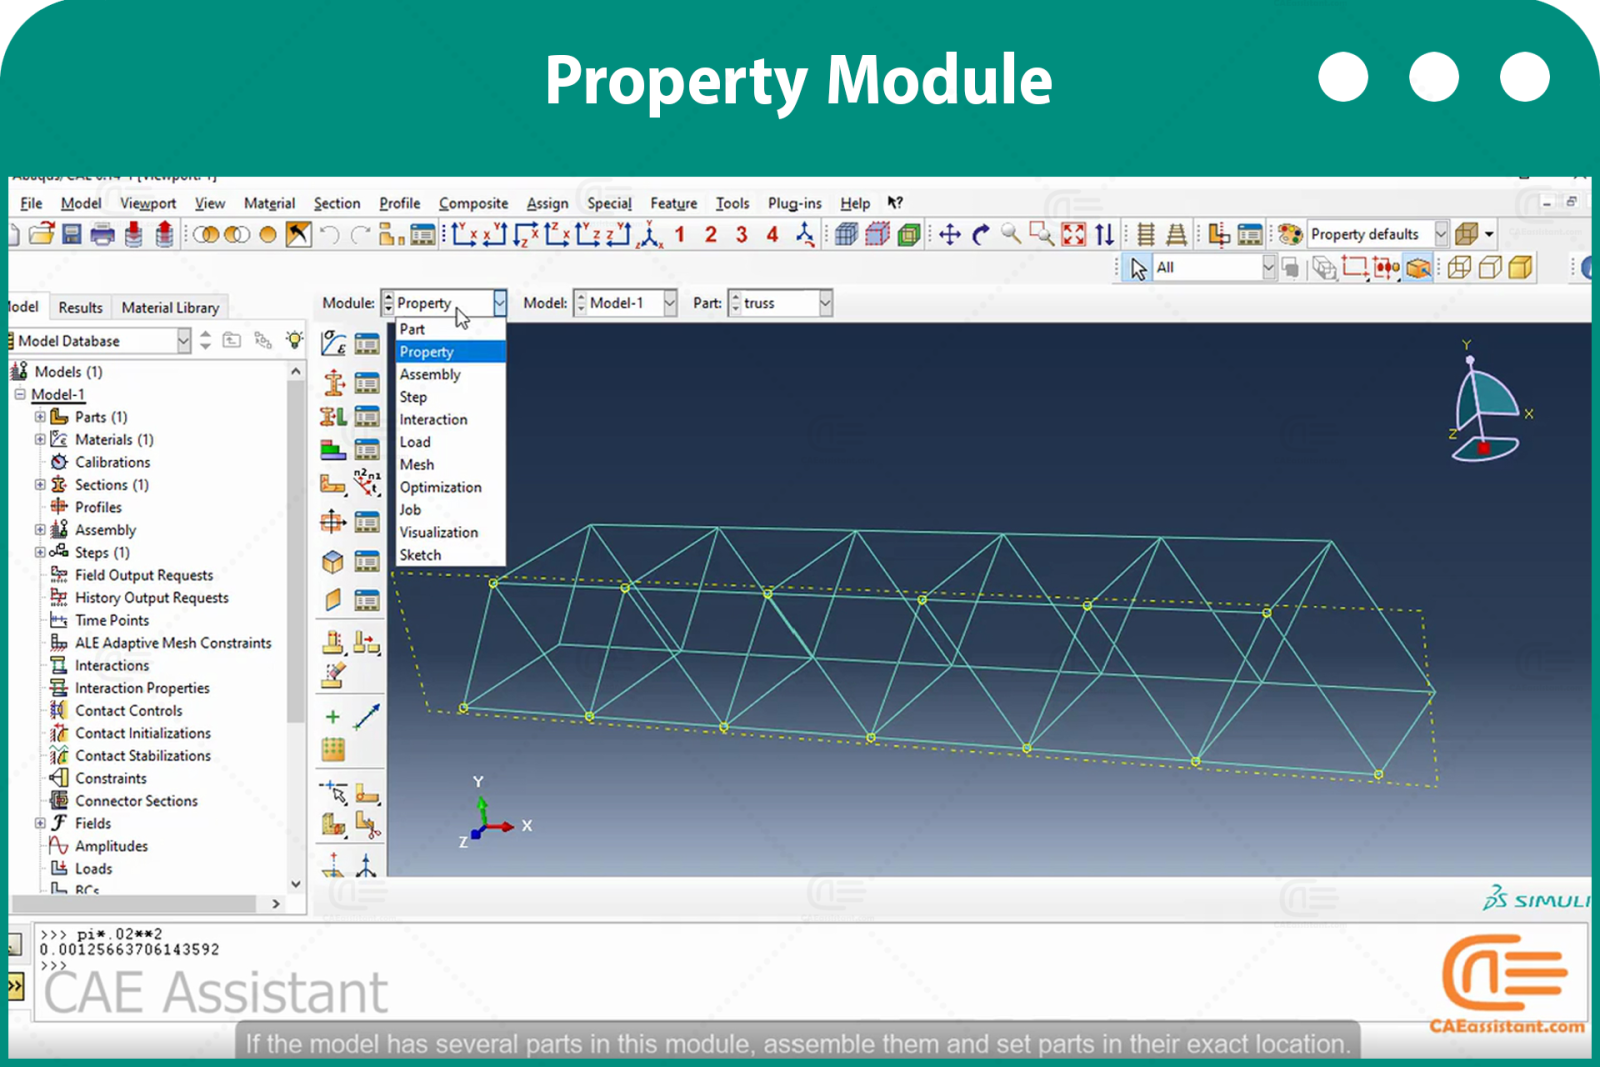
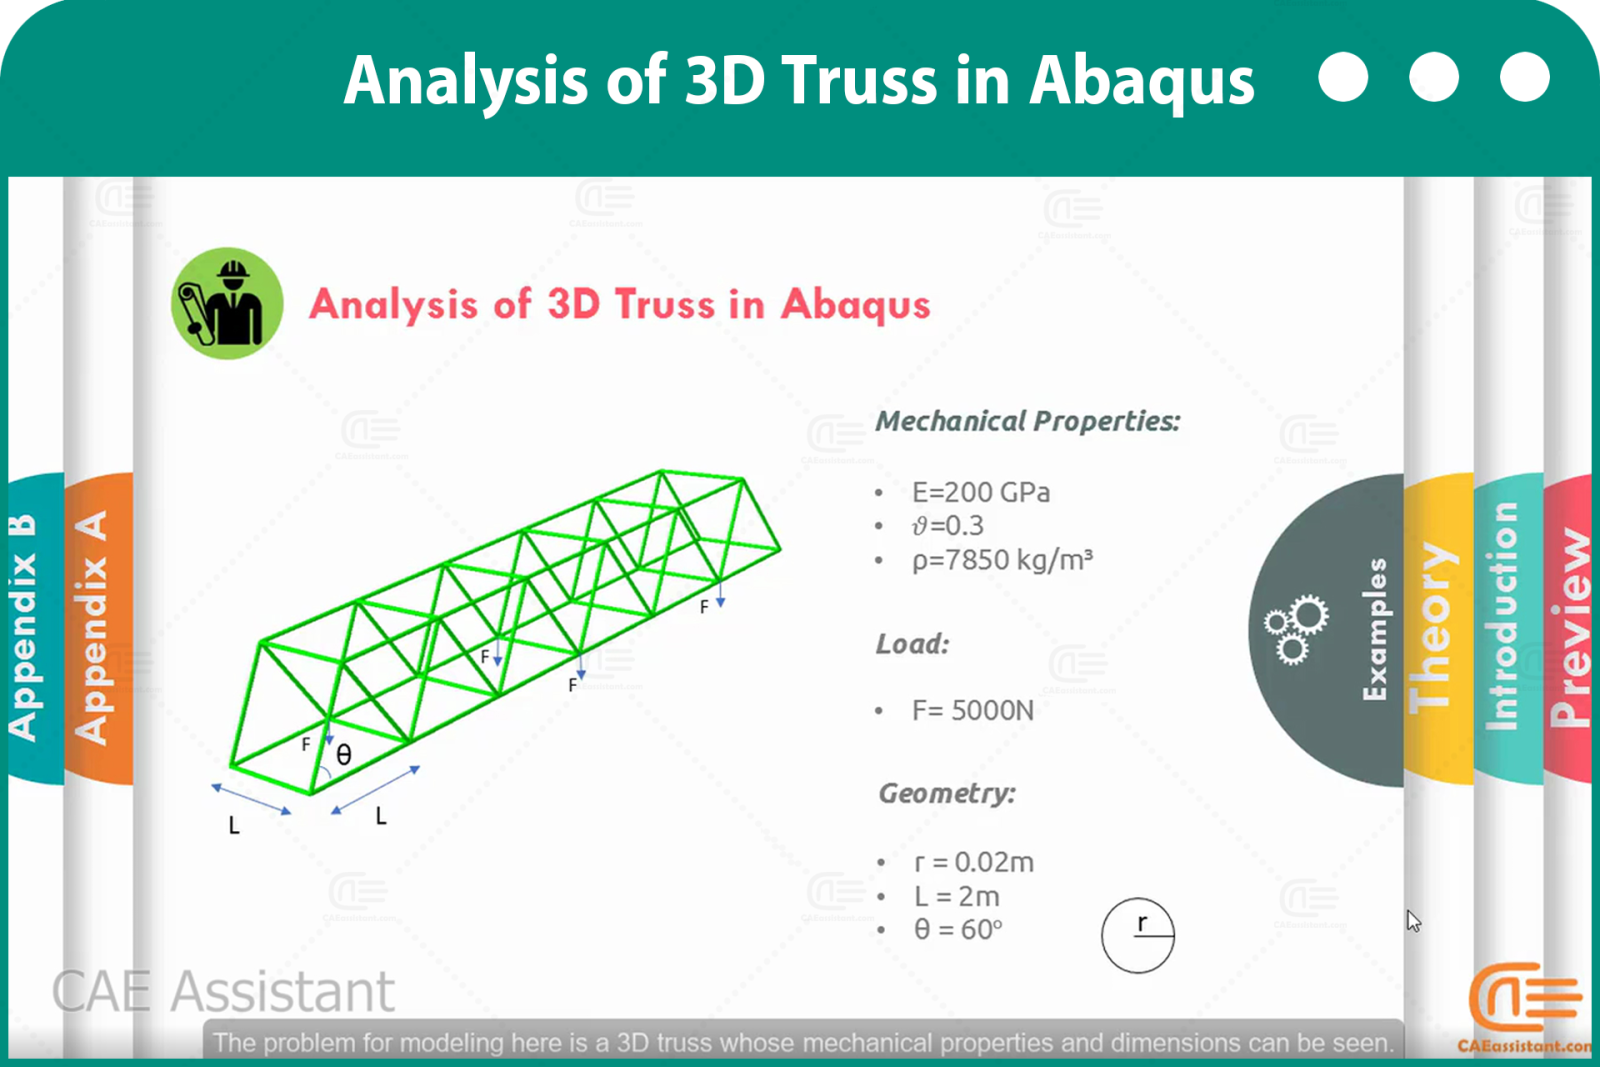
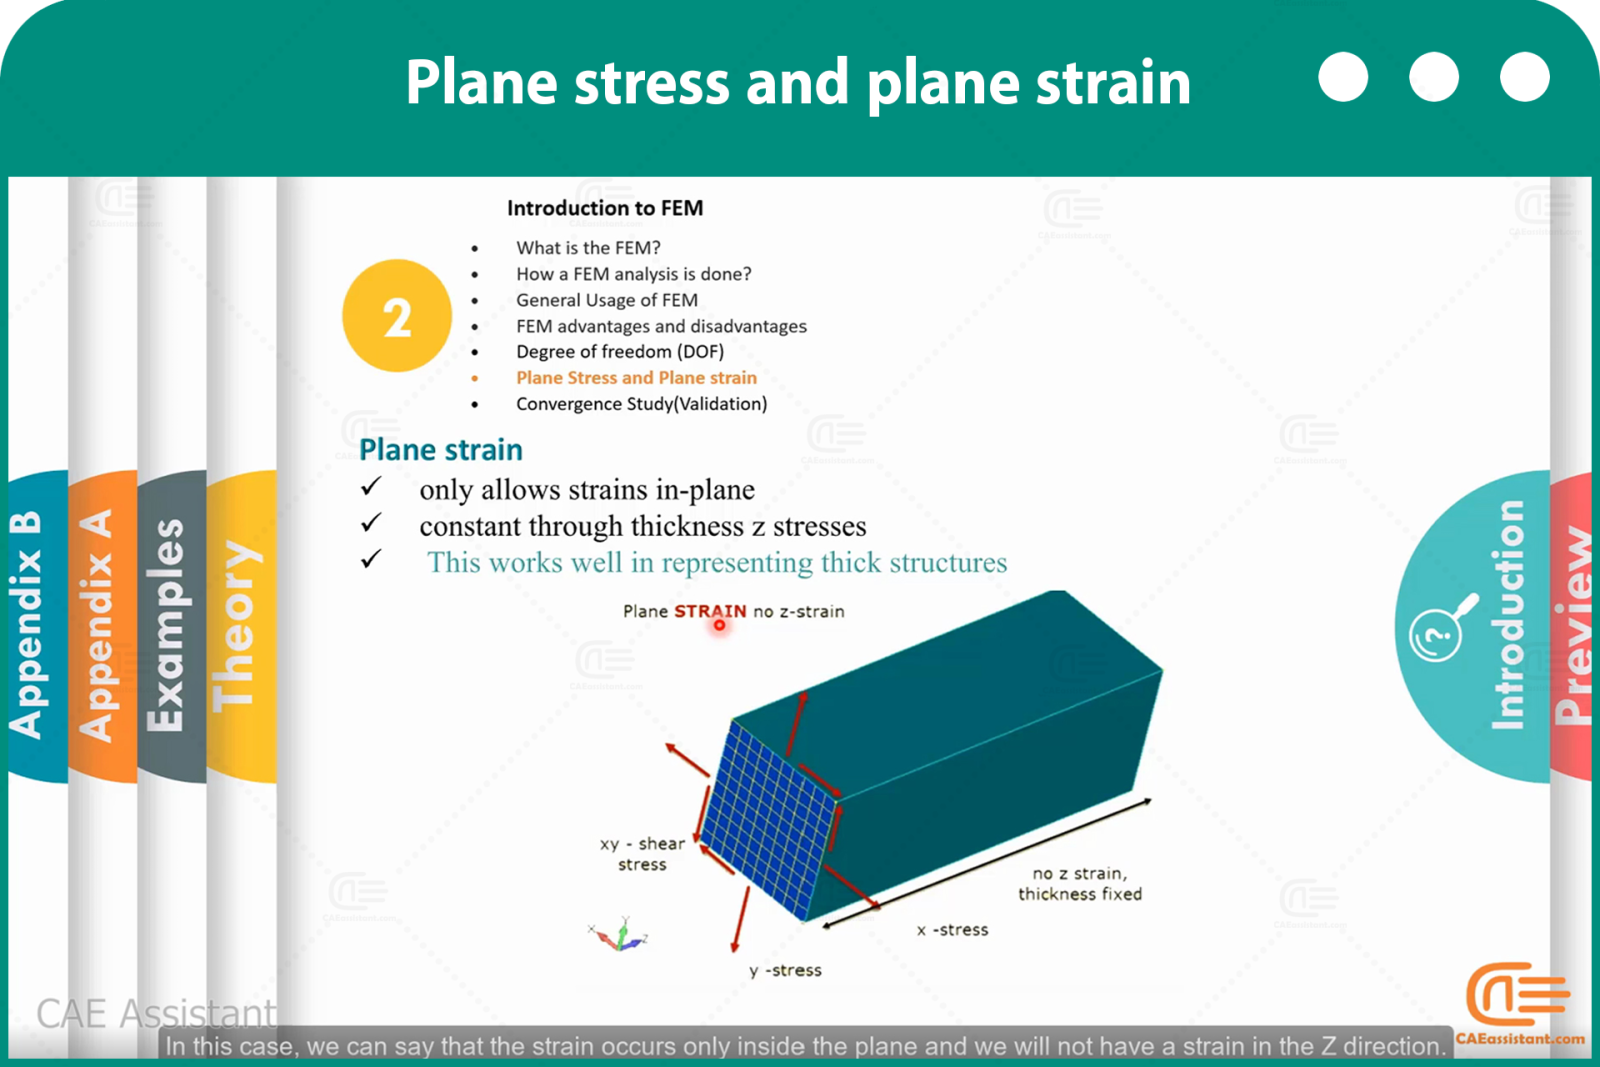
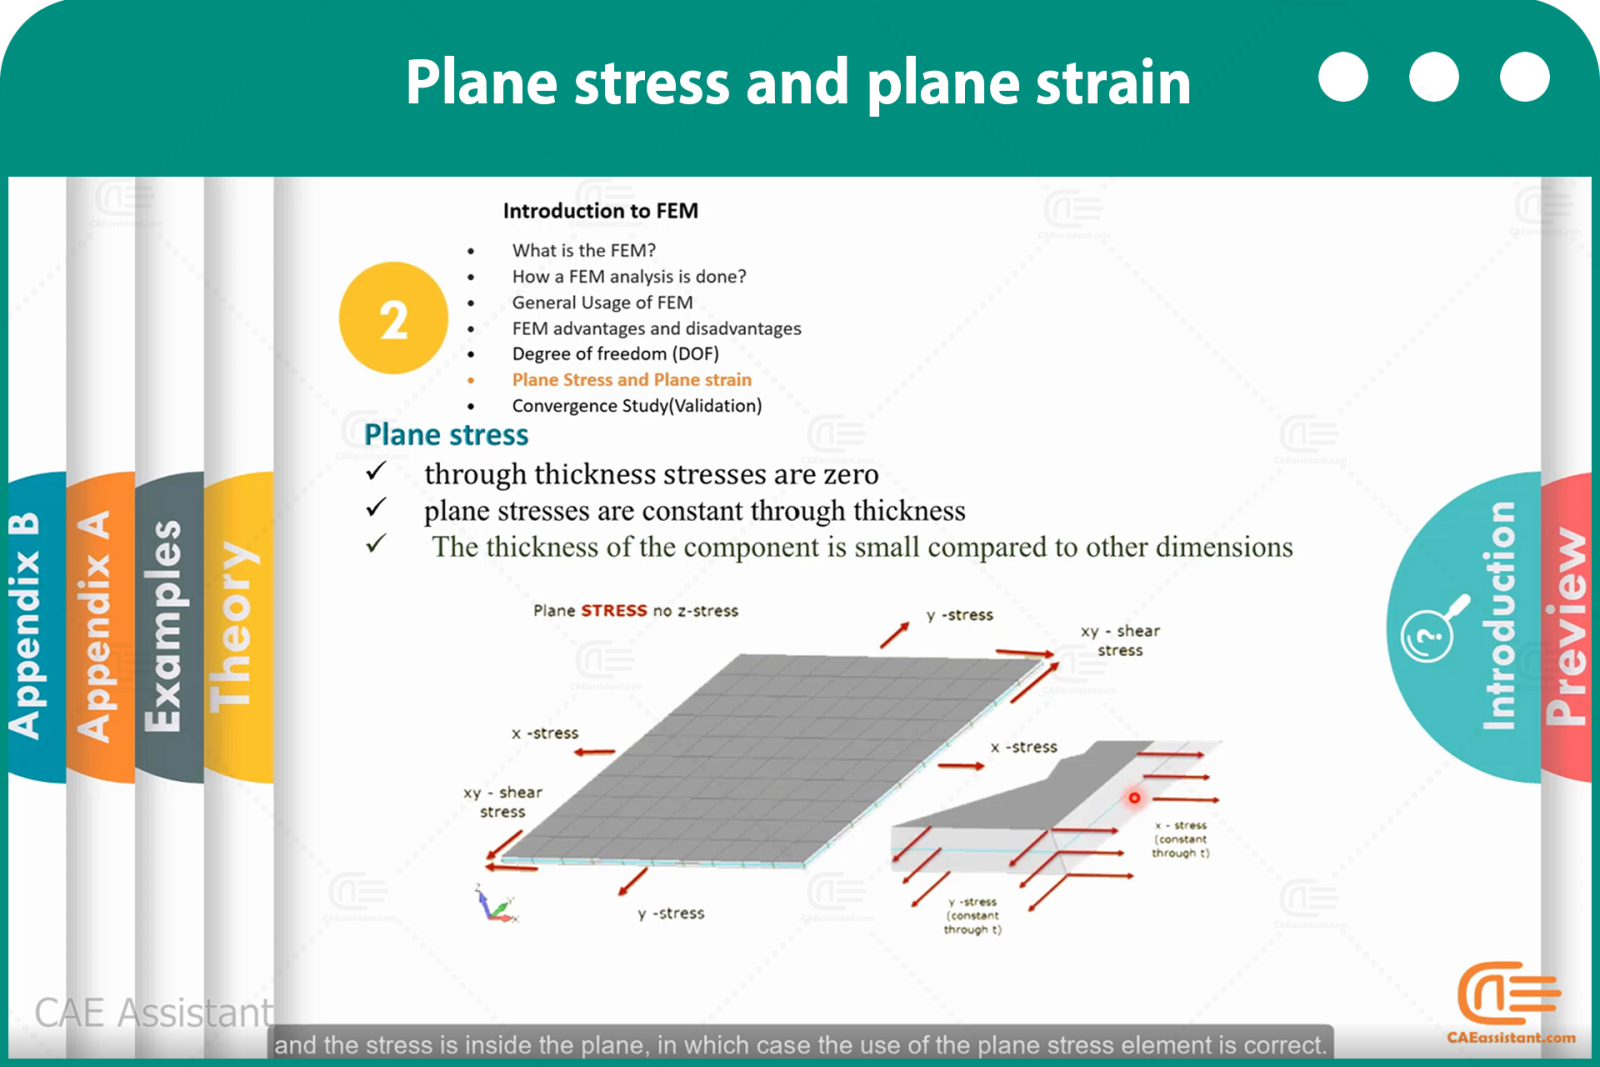
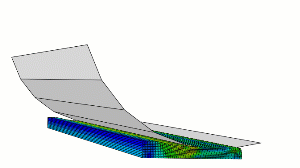
초보자를 위한 Abaqus 코스 패키지(FEA 시뮬레이션 튜토리얼)에는 다음이 포함됩니다. 8개의 수업 그리고 14개 워크숍. 워크숍 주제는 ABAQUS 학습에 필요한 다양한 팁을 제공합니다. 면적, 트러스 구조물 모델링, 보 구조물 모델링, 응력 집중 계산, 하중을 받는 판의 변위 계산, 정적 및 동적 하중을 고려한 구조물 시뮬레이션, 고유 진동수 계산, 좌굴 하중 계산, 성형 해석, 열전달 문제 시뮬레이션, 열전달 연성 문제 시뮬레이션, 비연성 열전달 문제 시뮬레이션, 충격 시뮬레이션 등의 주제를 다룹니다. 워크숍에서는 다양한 유한요소법(FEM) 시뮬레이션 사례가 제공됩니다.

Abaqus 튜토리얼     그것은 당신이 가는 길을 안내할 것입니다 기본부터 복잡한 것까지 시뮬레이션 기술이며 매우 유동적이고 포괄적이다 그리고 모든 세부 사항이 설명되어 있습니다.

Abaqus 튜토리얼    모든 수업은 진행됩니다 요점을 바로 짚다, 쓸모없는 콘텐츠 없이 말이죠. 매 단계마다 필요한 것을 배우고, 그것을 실제로 적용하게 될 것입니다. 첫날부터요.

한마디로, 이 과정에서 완벽함과 지원을 받는 것이 이 과정의 본질적인 가치입니다.

Abaqus 튜토리얼        가장 중요한 것은, 우리는 당신을 지원합니다 이 과정에서 배우는 것처럼. 전문가에게 문의하세요 질문을 하고 모델링과 시뮬레이션을 즐겨보세요 단계별 지원.
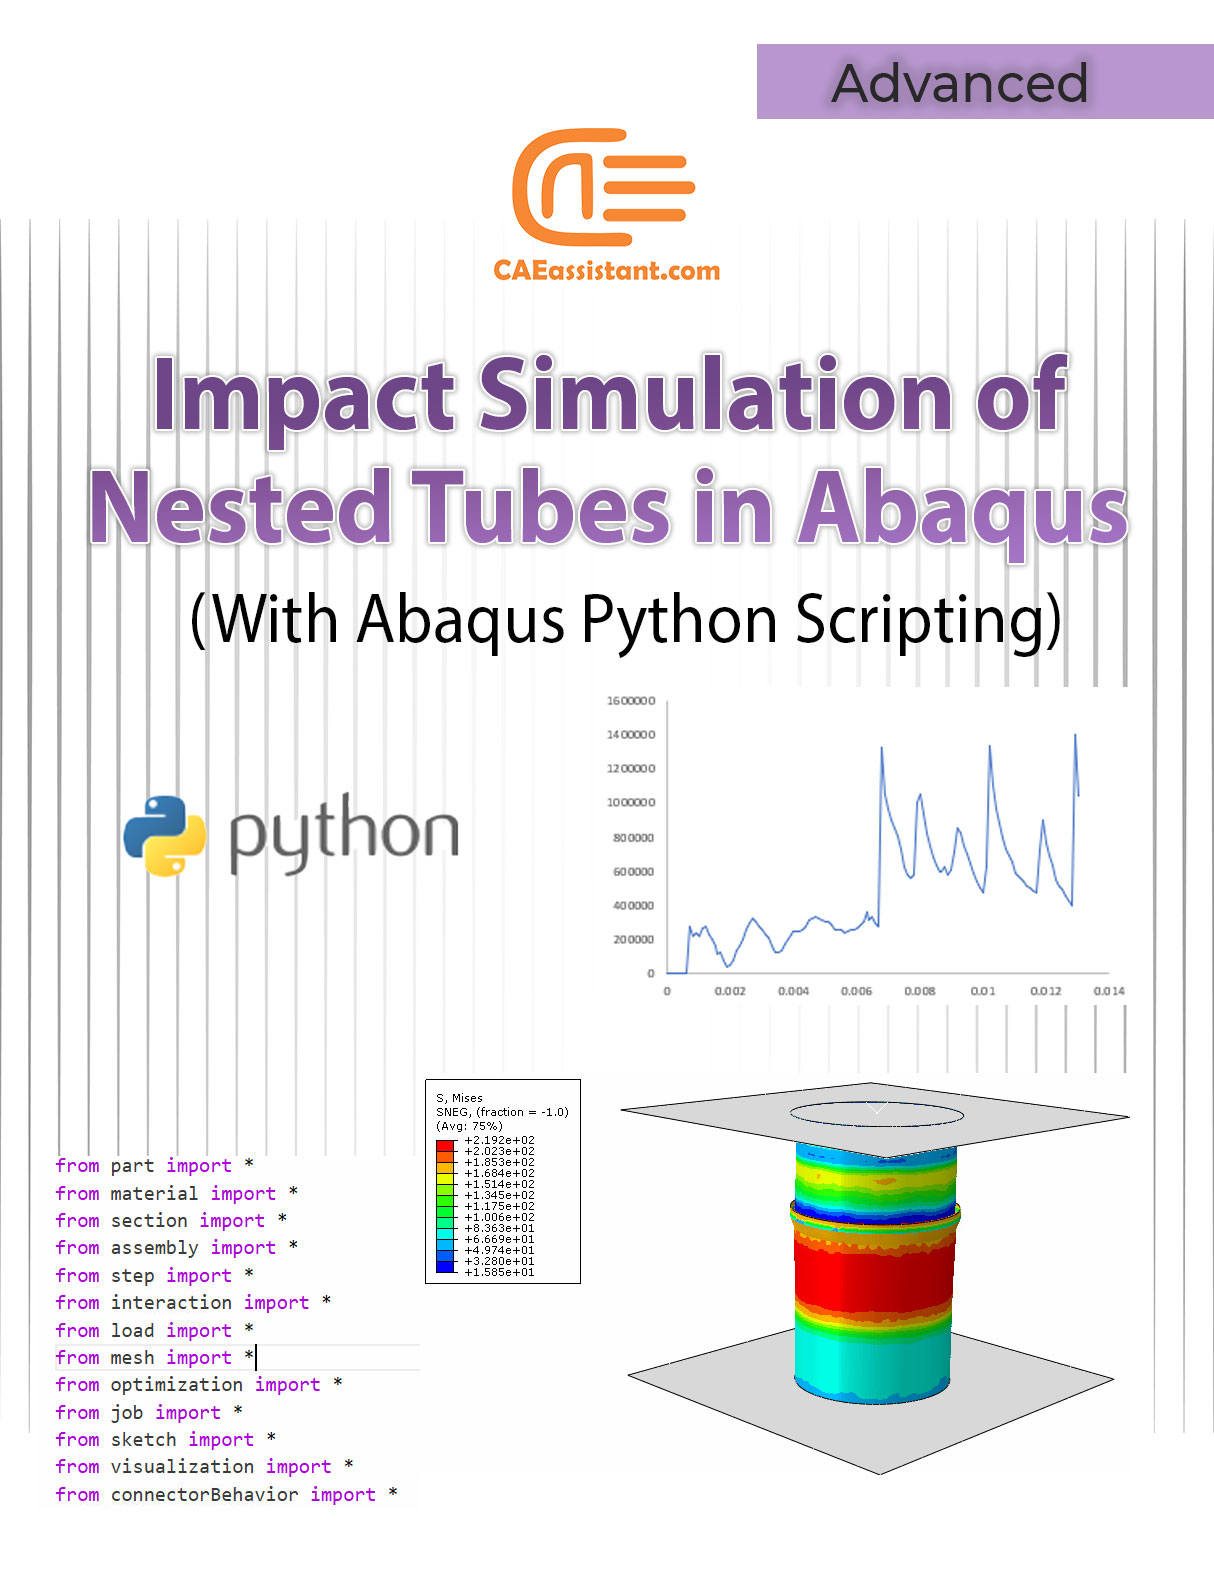
Abaqus 튜토리얼        이것은 단지 시작일 뿐입니다. Abaqus 및 시뮬레이션 전문가가 되고 싶다면 우리의 고급 패키지를 사용하세요 그리고 고급 Abacus 코딩의 전문가가 되세요.


더 읽어보세요: Abaqus 학생용 버전 | Abaqus 다운로드 버전


이 FEA 교육 패키지의 각 비디오의 정확한 내용은 무엇입니까?

이 탭의 오른쪽 섹션에서 각 수업의 장을 클릭하면 이 매우 포괄적이고 유용한 ABAQUS 과정 패키지에 제시된 팁과 문제에 대한 세부 정보를 알 수 있습니다.

보는 것이 유용할 것입니다 Abaqus 문서 Abaqus 시뮬레이션을 시작하기가 얼마나 어려운지 이해하려면 Abaqus 튜토리얼.

그만큼 CAE 보조원 저희는 고객님의 모든 CAE 요구 사항을 충족하기 위해 최선을 다하고 있으며, 고객님의 피드백은 이러한 목표 달성에 큰 도움이 됩니다. 궁금한 점이 있거나 문제가 발생하면 WhatsApp을 포함한 소셜 미디어 계정을 통해 언제든지 공유해 주세요.
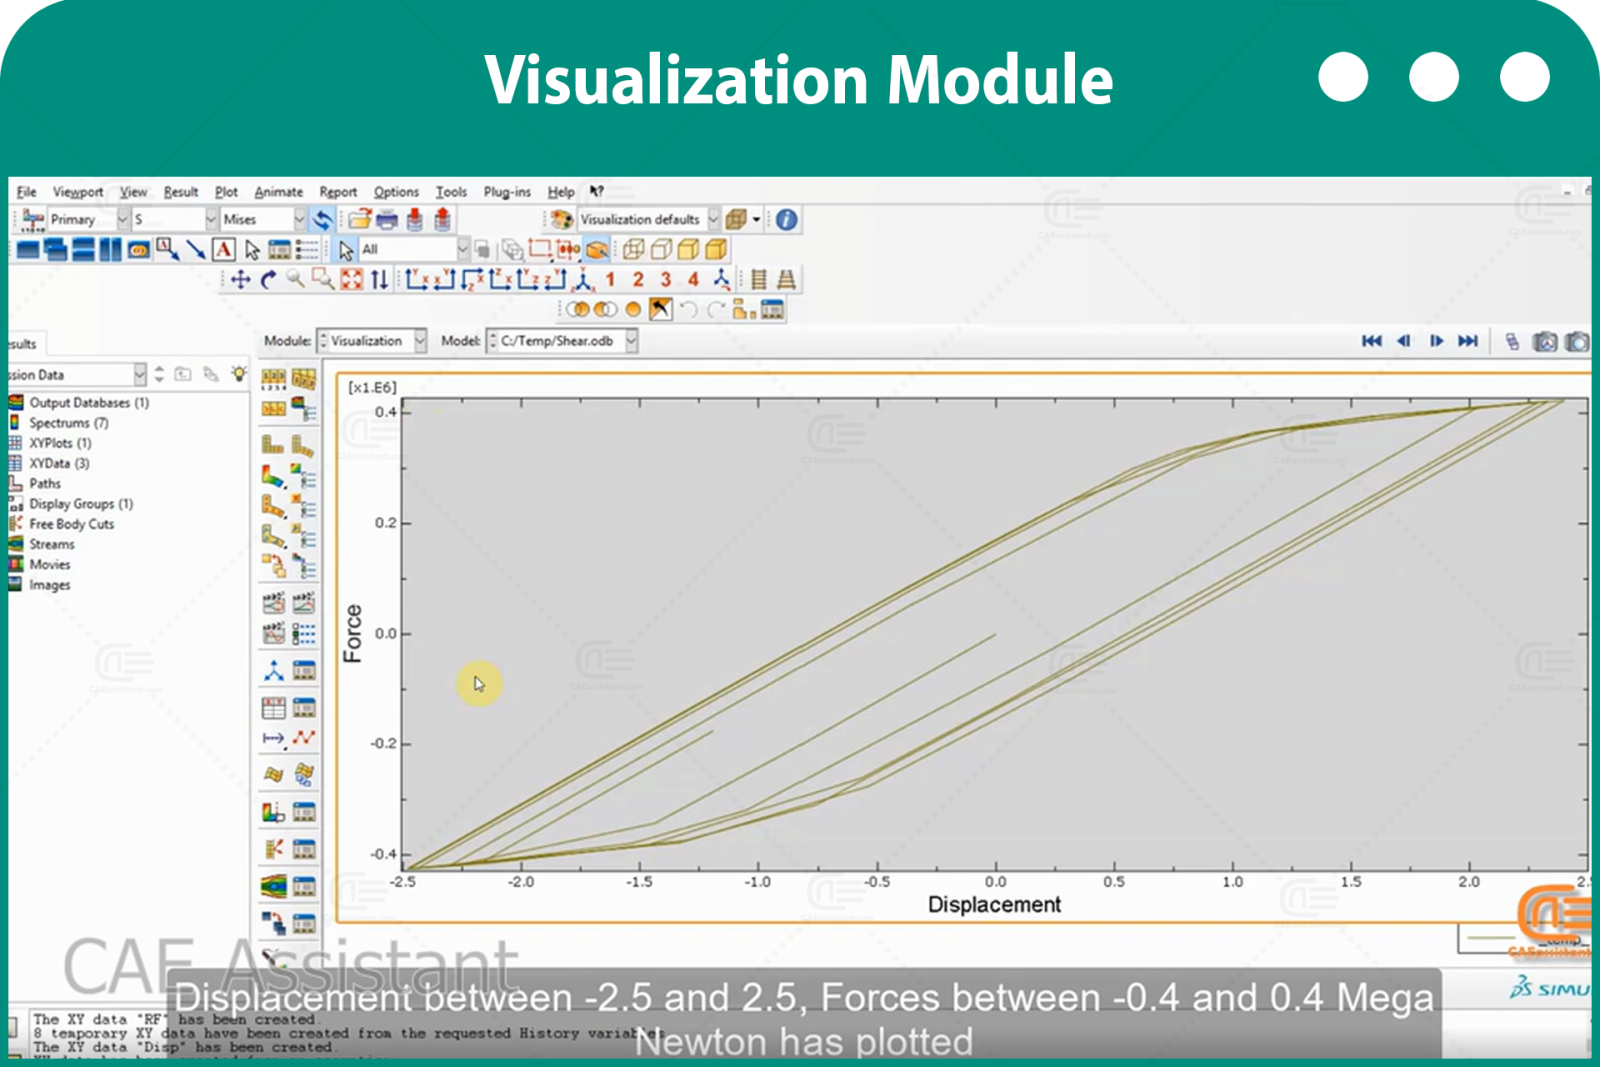

더 읽어보세요: Abaqus 시각화


더 읽어보세요: FEA 해석 소개

Abaqus/CAE에서 Abaqus 그래픽 설정 저장 | Abaqus Views 도구 모음

Abaqus 작업 종료 | Abaqus 작업 일시 중지 | Abaqus 작업 명령

Abaqus 속도 적용 | 각속도 대 선형속도

Abaqus에서 inp 파일이란 무엇이고, Abaqus에서 inp 파일을 여는 방법은 무엇인가요? Abaqus에서 .inp 파일 실행하기


[woodmart_list icon_library=”openiconic” woodmart_css_id=”5dfa8e3e0668e” list=”%5B%7B%22list-content%22%3A%22What%20do%20we%20learn%20from%20this%20package%3F%22%7D%2C%7B%22list-content%22%3A%22Teaching%20plan%20and%20Prerequisites%20and%20Next%20steps%20%22%7D%2C%7B%22list-content%22%3A%22Package%20specification%22%7D%5D” icon_openiconic=”vc-oi vc-oi-play” icons_color=”eyJwYXJhbV90eXBlIjoid29vZG1hcnRfY29sb3JwaWNrZXIiLCJjc3NfYXJncyI6eyJjb2xvciI6WyIgLmxpc3QtaWNvbiJdfSwic2VsZWN0b3JfaWQiOiI1ZGZhOGUzZTA2NjhlIiwiZGF0YSI6eyJkZXNrdG9wIjoiI2Y1ODYzNCJ9fQ==”]

여기서 데모를 볼 수 있습니다.

[woodmart_popup shape=”round” width=”800″ woodmart_css_id=”5def77c20eda5″ title=”Watch Video” full_width=”no” button_inline=”no”]
[/woodmart_popup]
[woodmart_list icon_library=”openiconic” woodmart_css_id=”620a601178adc” list=”%5B%7B%22list-content%22%3A%22What%20is%20CAD%2FCAM%2FCAE%3F%3Cspan%20style%3D%5C%22float%3A%20right%3B%5C%22%3E%3C%2Fspan%3E%22%7D%2C%7B%22list-content%22%3A%22Abaqus%20window%20introduction%3Cspan%20style%3D%5C%22float%3A%20right%3B%5C%22%3E%3C%2Fspan%3E%22%7D%2C%7B%22list-content%22%3A%22Introduction%20to%20different%20modules%20in%20Abaqus%3Cspan%20style%3D%5C%22float%3A%20right%3B%5C%22%3E%3C%2Fspan%3E%22%7D%2C%7B%22list-content%22%3A%22Units%20in%20Abaqus%3Cspan%20style%3D%5C%22float%3A%20right%3B%5C%22%3E%3C%2Fspan%3E%22%7D%2C%7B%22list-content%22%3A%22One%20simple%20simulation%20from%20A-Z%20step%20by%20step%3Cspan%20style%3D%5C%22float%3A%20right%3B%5C%22%3E%3C%2Fspan%3E%22%7D%2C%7B%22list-content%22%3A%22How%20to%20define%20isotropic%20elastic%20material%3Cspan%20style%3D%5C%22float%3A%20right%3B%5C%22%3E%3C%2Fspan%3E%22%7D%2C%7B%22list-content%22%3A%22How%20to%20use%20Truss%20element%20and%20related%20tips%3Cspan%20style%3D%5C%22float%3A%20right%3B%5C%22%3E%3C%2Fspan%3E%22%7D%2C%7B%22list-content%22%3A%22Using%20SI%20units%3Cspan%20style%3D%5C%22float%3A%20right%3B%5C%22%3E%3C%2Fspan%3E%22%7D%2C%7B%22list-content%22%3A%22How%20to%20apply%20concentrated%20Force%3Cspan%20style%3D%5C%22float%3A%20right%3B%5C%22%3E%3C%2Fspan%3E%22%7D%2C%7B%22list-content%22%3A%22How%20to%20define%20static%20analysis%20and%20time%20concept%20in%20this%20step%3Cspan%20style%3D%5C%22float%3A%20right%3B%5C%22%3E%3C%2Fspan%3E%22%7D%2C%7B%22list-content%22%3A%22Visualize%20the%20primary%20variables%20like%20stress%2C%20strain%20and%20etc.%3Cspan%20style%3D%5C%22float%3A%20right%3B%5C%22%3E%3C%2Fspan%3E%22%7D%2C%7B%22list-content%22%3A%22Get%20report%20for%20stress%2C%20strain%2C%20reaction%20forces%20and%20deflections%20%3Cspan%20style%3D%5C%22float%3A%20right%3B%5C%22%3E%3C%2Fspan%3E%22%7D%2C%7B%22list-content%22%3A%22How%20to%20scale%20results%3Cspan%20style%3D%5C%22float%3A%20right%3B%5C%22%3E%3C%2Fspan%3E%22%7D%2C%7B%22list-content%22%3A%22How%20to%20see%20node%20and%20Element%20numbers%3Cspan%20style%3D%5C%22float%3A%20right%3B%5C%22%3E%3C%2Fspan%3E%22%7D%2C%7B%22list-content%22%3A%22How%20to%20see%20undeformed%20and%20deformed%20results%20together%3Cspan%20style%3D%5C%22float%3A%20right%3B%5C%22%3E%3C%2Fspan%3E%22%7D%5D” icon_openiconic=”vc-oi vc-oi-play” icons_color=”eyJwYXJhbV90eXBlIjoid29vZG1hcnRfY29sb3JwaWNrZXIiLCJjc3NfYXJncyI6eyJjb2xvciI6WyIgLmxpc3QtaWNvbiJdfSwic2VsZWN0b3JfaWQiOiI2MjBhNjAxMTc4YWRjIiwiZGF0YSI6eyJkZXNrdG9wIjoiI2Y1ODYzNCJ9fQ==”]

이 강의에서는 먼저 CAE가 부품 또는 제품의 설계, 분석 및 생산에 있어 다른 방법들 중에서도 얼마나 중요한지에 대해 살펴봅니다. 이어서, CAE 소프트웨어의 개요와 모든 공통 옵션, 그리고 FEM 시뮬레이션 절차를 설명합니다.

최고의 유한요소해석(FEA) 시뮬레이션 소프트웨어 중 하나인 ABAQUS 소프트웨어를 사용할 때 중요한 문제 중 하나는 단위 결정입니다. 이 강의에서는 공통 단위와 호환 단위, 그리고 이를 구하는 방법을 설명합니다.

마지막으로, 집중력이 작용하는 2D 트러스를 시뮬레이션합니다. 이 예제에서는 모든 시뮬레이션 절차를 단계별로 설명합니다. 또한, 재료 할당, 하중, 응력, 변형률과 같은 일반적인 출력값 관찰, 그리고 절점 변위와 같은 원하는 항목에 대한 보고서 작성 등 다양한 모듈의 유용한 팁도 설명합니다. 설명을 계속 읽어주시면 훌륭한 FEA 교육이 될 것이라고 약속드립니다.

[woodmart_list icon_library=”openiconic” woodmart_css_id=”620a65c2841ab” list=”%5B%7B%22list-content%22%3A%22What%20is%20the%20FEM%3F%20%20%3Cspan%20style%3D%5C%22float%3A%20right%3B%5C%22%3E%3C%2Fspan%3E%5Cn%5Cn%22%7D%2C%7B%22list-content%22%3A%22Familiarity%20with%20Discretization%20Concept%3Cspan%20style%3D%5C%22float%3A%20right%3B%5C%22%3E%3C%2Fspan%3E%22%7D%2C%7B%22list-content%22%3A%22Analytical%20solutions%20vs%20FEM%20%3Cspan%20style%3D%5C%22float%3A%20right%3B%5C%22%3E%3C%2Fspan%3E%22%7D%2C%7B%22list-content%22%3A%22How%20a%20FEM%20analysis%20is%20done%3F%3Cspan%20style%3D%5C%22float%3A%20right%3B%5C%22%3E%3C%2Fspan%3E%22%7D%2C%7B%22list-content%22%3A%22How%20to%20discretize%20the%20domain%3F%3Cspan%20style%3D%5C%22float%3A%20right%3B%5C%22%3E%3C%2Fspan%3E%22%7D%2C%7B%22list-content%22%3A%22How%20to%20calculate%20nodal%20solution%3F%3Cspan%20style%3D%5C%22float%3A%20right%3B%5C%22%3E%3C%2Fspan%3E%22%7D%2C%7B%22list-content%22%3A%22Where%20FEM%20is%20used%3Cspan%20style%3D%5C%22float%3A%20right%3B%5C%22%3E%3C%2Fspan%3E%22%7D%2C%7B%22list-content%22%3A%22General%20Usage%20of%20FEM%3Cspan%20style%3D%5C%22float%3A%20right%3B%5C%22%3E%3C%2Fspan%3E%22%7D%2C%7B%22list-content%22%3A%22An%20example%20of%20structural%20analysis%3Cspan%20style%3D%5C%22float%3A%20right%3B%5C%22%3E%3C%2Fspan%3E%22%7D%2C%7B%22list-content%22%3A%22Degree%20of%20freedom%3Cspan%20style%3D%5C%22float%3A%20right%3B%5C%22%3E%3C%2Fspan%3E%22%7D%2C%7B%22list-content%22%3A%22Convergence%20Study(Validation)%3Cspan%20style%3D%5C%22float%3A%20right%3B%5C%22%3E%3C%2Fspan%3E%22%7D%2C%7B%22list-content%22%3A%22Plane%20stress%20and%20plane%20strain%20conditions%3Cspan%20style%3D%5C%22float%3A%20right%3B%5C%22%3E%3C%2Fspan%3E%22%7D%2C%7B%22list-content%22%3A%22Tips%20to%20start%20all%20simulations%3Cspan%20style%3D%5C%22float%3A%20right%3B%5C%22%3E%3C%2Fspan%3E%22%7D%2C%7B%22list-content%22%3A%22Create%20points%20and%20models%20in%203D%20space%3Cspan%20style%3D%5C%22float%3A%20right%3B%5C%22%3E%3C%2Fspan%3E%22%7D%2C%7B%22list-content%22%3A%22What%20is%20model%20tree%20and%20how%20to%20use%20it%3F%3Cspan%20style%3D%5C%22float%3A%20right%3B%5C%22%3E%3C%2Fspan%3E%22%7D%2C%7B%22list-content%22%3A%22How%20to%20use%20Probe%20value%20option%20to%20watch%20some%20results%3F%3Cspan%20style%3D%5C%22float%3A%20right%3B%5C%22%3E%3C%2Fspan%3E%22%7D%2C%7B%22list-content%22%3A%22How%20to%20simulate%20with%20plane%20stress%20element%20and%20usage%20conditions%3F%3Cspan%20style%3D%5C%22float%3A%20right%3B%5C%22%3E%3C%2Fspan%3E%22%7D%2C%7B%22list-content%22%3A%22What%20are%20simplify%20conditions%20to%20model%20one%20part%20of%20model%20%3F%3Cspan%20style%3D%5C%22float%3A%20right%3B%5C%22%3E%3C%2Fspan%3E%22%7D%2C%7B%22list-content%22%3A%22How%20to%20apply%20uniform%20tension%3F%3Cspan%20style%3D%5C%22float%3A%20right%3B%5C%22%3E%3C%2Fspan%3E%22%7D%2C%7B%22list-content%22%3A%22Using%20remeshing%20rule%20option%20to%20check%20convergency%3F%3Cspan%20style%3D%5C%22float%3A%20right%3B%5C%22%3E%3C%2Fspan%3E%22%7D%2C%7B%22list-content%22%3A%22How%20to%20get%20result%20in%20specific%20path%3F%3Cspan%20style%3D%5C%22float%3A%20right%3B%5C%22%3E%3C%2Fspan%3E%22%7D%5D” icon_openiconic=”vc-oi vc-oi-ok” icons_color=”eyJwYXJhbV90eXBlIjoid29vZG1hcnRfY29sb3JwaWNrZXIiLCJjc3NfYXJncyI6eyJjb2xvciI6WyIgLmxpc3QtaWNvbiJdfSwic2VsZWN0b3JfaWQiOiI2MjBhNjVjMjg0MWFiIiwiZGF0YSI6eyJkZXNrdG9wIjoiI2Y1ODYzNCJ9fQ==” css=”.vc_custom_1644849133841{padding-left: 5px !important;}”]

이 강의는 유한요소(FEM 시뮬레이션) 사용자에게 매우 유용합니다. Abaqus 과정의 이 강의를 통해 유한요소에 대해 완전히 이해하게 될 것입니다. 먼저, 공중 구조물의 메시 생성, 원의 둘레 계산, 기하학적으로 복잡한 구조물의 변위 계산과 같은 몇 가지 간단한 예제로 시작합니다. 그런 다음, 유한요소 도구를 사용하여 문제를 단계별로 해결하는 방법을 살펴봅니다.

또한, 이 강의에서는 형상, 요소 및 절점, 자유도 측면에서 다양한 유형의 요소에 대해 설명하고, 두 가지 유형의 문제에 유한 요소를 사용하는 방법을 설명합니다. 또한, FEM 시뮬레이션 방법을 사용하여 어려운 형상을 단계별로 해결하는 방법을 설명합니다. 사용자는 FEM 시뮬레이션 방법의 장단점을 알아야 합니다.

이러한 내용은 예제와 그림을 통해 완벽하게 설명될 것입니다. 마지막으로, 자유도, 평면응력 요소, 그리고 평면변형률에 대해 이러한 요소들을 활용할 수 있는 문제들을 통해 완벽하게 설명될 것입니다. 시뮬레이션 소프트웨어 사용에 있어 가장 중요한 문제 중 하나는 수렴성 연구라는 것을 알아야 합니다. 수렴성 연구에 대한 설명은 이 강의의 마지막 이론 내용입니다.

이 수업에서는 두 가지 워크숍을 다룹니다. 첫 번째 워크숍에서는 소프트웨어 트리 다이어그램, 결과 해석 등을 사용하여 3차원 트러스를 시뮬레이션하여 공간에 3차원 구조물을 모델링합니다. 두 번째 워크숍에서는 시트에 평면 응력이 작용하고, 평면 요소와 관련된 참고 사항, 인장 광범위 하중 적용, 곡선 경로에서 결과 해석, 대칭 조건 및 모델 단순화, 수렴성 분석을 위한 소프트웨어 기법 등을 학습합니다. 이 Abaqus 과정은 분명 유익할 것입니다. 

[woodmart_list icon_library=”openiconic” woodmart_css_id=”620a697623b9b” list=”%5B%7B%22list-content%22%3A%22Introduction%20to%20ABAQUS%20Element%20Library%3Cspan%20style%3D%5C%22float%3A%20right%3B%5C%22%3E%3C%2Fspan%3E%5Cn%22%7D%2C%7B%22list-content%22%3A%22Characterizing%20elements%3Cspan%20style%3D%5C%22float%3A%20right%3B%5C%22%3E%3C%2Fspan%3E%22%7D%2C%7B%22list-content%22%3A%22Introduction%20to%20different%20Types%20of%20Elements%3Cspan%20style%3D%5C%22float%3A%20right%3B%5C%22%3E%3C%2Fspan%3E%22%7D%2C%7B%22list-content%22%3A%22Different%20%20Types%20of%20degree%20of%20freedoms%3Cspan%20style%3D%5C%22float%3A%20right%3B%5C%22%3E%3C%2Fspan%3E%22%7D%2C%7B%22list-content%22%3A%22Element%20and%20node%20numbering%3Cspan%20style%3D%5C%22float%3A%20right%3B%5C%22%3E%3C%2Fspan%3E%22%7D%2C%7B%22list-content%22%3A%22Element%20formulation%3Cspan%20style%3D%5C%22float%3A%20right%3B%5C%22%3E%3C%2Fspan%3E%22%7D%2C%7B%22list-content%22%3A%22Integration%20Points%3Cspan%20style%3D%5C%22float%3A%20right%3B%5C%22%3E%3C%2Fspan%3E%22%7D%2C%7B%22list-content%22%3A%22Beam%20Element%20and%20usage%20conditions%3Cspan%20style%3D%5C%22float%3A%20right%3B%5C%22%3E%3C%2Fspan%3E%22%7D%2C%7B%22list-content%22%3A%22Types%20of%20Beams%3A%20Euler-Bernoulli%3Cspan%20style%3D%5C%22float%3A%20right%3B%5C%22%3E%3C%2Fspan%3E%22%7D%2C%7B%22list-content%22%3A%22%20Types%20of%20Beams%3A%20Timoshenko%3Cspan%20style%3D%5C%22float%3A%20right%3B%5C%22%3E%3C%2Fspan%3E%22%7D%2C%7B%22list-content%22%3A%22Beam%20element%20library%20of%20Abaqus%3Cspan%20style%3D%5C%22float%3A%20right%3B%5C%22%3E%3C%2Fspan%3E%22%7D%2C%7B%22list-content%22%3A%22Simulation%20with%20beam%20Element%3Cspan%20style%3D%5C%22float%3A%20right%3B%5C%22%3E%3C%2Fspan%3E%22%7D%2C%7B%22list-content%22%3A%22How%20to%20specify%20beam%20orientation%20to%20watch%20some%20results%3Cspan%20style%3D%5C%22float%3A%20right%3B%5C%22%3E%3C%2Fspan%3E%22%7D%2C%7B%22list-content%22%3A%22How%20create%20profile%20for%20beam%20section%3Cspan%20style%3D%5C%22float%3A%20right%3B%5C%22%3E%3C%2Fspan%3E%22%7D%2C%7B%22list-content%22%3A%22How%20to%20see%20parts%20in%20different%20colors%3Cspan%20style%3D%5C%22float%3A%20right%3B%5C%22%3E%3C%2Fspan%3E%22%7D%2C%7B%22list-content%22%3A%22How%20to%20plot%20moment%20and%20force%20with%20in%20beam%20model%3Cspan%20style%3D%5C%22float%3A%20right%3B%5C%22%3E%3C%2Fspan%3E%22%7D%2C%7B%22list-content%22%3A%22Settings%20for%20plot(Font%2FColor%2Fmultiple%20plot%2FLegend%20ant%20etc.)%3Cspan%20style%3D%5C%22float%3A%20right%3B%5C%22%3E%3C%2Fspan%3E%22%7D%2C%7B%22list-content%22%3A%22How%20to%20model%20beam%20with%203D%20element%3Cspan%20style%3D%5C%22float%3A%20right%3B%5C%22%3E%3C%2Fspan%3E%22%7D%2C%7B%22list-content%22%3A%22How%20to%20define%20Dynamic%20Analysis%3Cspan%20style%3D%5C%22float%3A%20right%3B%5C%22%3E%3C%2Fspan%3E%22%7D%2C%7B%22list-content%22%3A%22How%20to%20get%20html%20%20report%20from%20simulation%20steps%3Cspan%20style%3D%5C%22float%3A%20right%3B%5C%22%3E%3C%2Fspan%3E%22%7D%5D” icon_openiconic=”vc-oi vc-oi-ok” icons_color=”eyJwYXJhbV90eXBlIjoid29vZG1hcnRfY29sb3JwaWNrZXIiLCJjc3NfYXJncyI6eyJjb2xvciI6WyIgLmxpc3QtaWNvbiJdfSwic2VsZWN0b3JfaWQiOiI2MjBhNjk3NjIzYjliIiwiZGF0YSI6eyJkZXNrdG9wIjoiI2Y1ODYzNCJ9fQ==” css=”.vc_custom_1644849814095{padding-left: 5px !important;}”]
  • 이 강의는 유한요소해석(FEA) 시뮬레이션 주제의 요소에 중점을 둡니다. 먼저 요소의 특성 유형(요소군, 자유도, 절점 수, 공식화, 적분 등)을 자세히 설명합니다. 그런 다음 보 요소와 그 사용 항목을 소개합니다. 보 요소는 베르누이와 티모셴코, 두 가지 공식화에 사용될 수 있으며, 이론과 응용 분야가 서로 다릅니다. 이에 대해 자세히 설명합니다.
  • 이 Abaqus 과정의 첫 번째 워크숍에서는 집중력을 받는 단일 클램프 보를 시뮬레이션합니다. 시뮬레이션 결과와 공식화 분석 결과를 비교합니다.
  • 두 번째 워크숍에서는 보 요소와 연속체 요소를 사용한 보 시뮬레이션을 수행하고 비교합니다. 이 워크숍에서는 연속체 요소를 사용한 시뮬레이션, 보 요소 시뮬레이션 팁, 모멘트 결과 추출, 보 및 단면에 작용하는 힘, 그리고 다양한 색상을 사용한 부품 관찰 방법을 설명합니다. 또한, 하중을 포함하는 동적 해석에서의 보 모델링과 시뮬레이션 절차에서 HTML 결과를 얻는 방법(FEM 시뮬레이션/FEA 시뮬레이션)도 설명합니다.
[woodmart_list icon_library=”openiconic” woodmart_css_id=”620a6baf32cd7″ list=”%5B%7B%22list-content%22%3A%22Monitor%20difference%20in%20Implicit%20and%20Explicit%3Cspan%20style%3D%5C%22float%3A%20right%3B%5C%22%3E%3C%2Fspan%3E%5Cn%5Cn%22%7D%2C%7B%22list-content%22%3A%22Points%20to%20Choose%20between%20Explicit%20%26%20Implicit%3Cspan%20style%3D%5C%22float%3A%20right%3B%5C%22%3E%3C%2Fspan%3E%22%7D%2C%7B%22list-content%22%3A%22Element%20library%2FAnalysis%20procedures%2FMaterial%20models%2F%5CnContact%20formulation%2FSolution%20technique%2F%5CnDisk%20space%20%26%20memory%20in%20Two%20Solvers%3Cspan%20style%3D%5C%22float%3A%20right%3B%5C%22%3E%3C%2Fspan%3E%22%7D%2C%7B%22list-content%22%3A%22Quasi%20static%20vs%20static%20vs%20dynamic%3Cspan%20style%3D%5C%22float%3A%20right%3B%5C%22%3E%3C%2Fspan%3E%22%7D%2C%7B%22list-content%22%3A%22Story%20for%20Quasi%20static%2C%20static%20%2Cand%20dynamic%20%3Cspan%20style%3D%5C%22float%3A%20right%3B%5C%22%3E%3C%2Fspan%3E%22%7D%2C%7B%22list-content%22%3A%22Mesh%20refinement%20for%20two%20solvers%3Cspan%20style%3D%5C%22float%3A%20right%3B%5C%22%3E%3C%2Fspan%3E%22%7D%2C%7B%22list-content%22%3A%22How%20Abaqus%20solve%20truss%20problem%20step%20by%20step%20with%20implicit%20solver%20%3Cspan%20style%3D%5C%22float%3A%20right%3B%5C%22%3E%3C%2Fspan%3E%22%7D%2C%7B%22list-content%22%3A%22Conditions%20to%20use%20Axisymmetric%20element%3Cspan%20style%3D%5C%22float%3A%20right%3B%5C%22%3E%3C%2Fspan%3E%22%7D%2C%7B%22list-content%22%3A%22Conditions%20and%20usage%20of%20Analytical%20rigid%20part%3Cspan%20style%3D%5C%22float%3A%20right%3B%5C%22%3E%3C%2Fspan%3E%22%7D%2C%7B%22list-content%22%3A%22How%20to%20define%20plasticity%3Cspan%20style%3D%5C%22float%3A%20right%3B%5C%22%3E%3C%2Fspan%3E%22%7D%2C%7B%22list-content%22%3A%22How%20to%20use%20assembly%20models%3Cspan%20style%3D%5C%22float%3A%20right%3B%5C%22%3E%3C%2Fspan%3E%22%7D%2C%7B%22list-content%22%3A%22common%20contact%20definition%3Cspan%20style%3D%5C%22float%3A%20right%3B%5C%22%3E%3C%2Fspan%3E%22%7D%2C%7B%22list-content%22%3A%22How%20to%20use%20test%20results%20for%20stress-strain%20input%20and%20Engineering%20stress(strain)%20vs%20True%20stress(strain)%20%3Cspan%20style%3D%5C%22float%3A%20right%3B%5C%22%3E%3C%2Fspan%3E%22%7D%2C%7B%22list-content%22%3A%22Shell%20simulation%20and%20conditions%20usage%20%3Cspan%20style%3D%5C%22float%3A%20right%3B%5C%22%3E%3C%2Fspan%3E%22%7D%2C%7B%22list-content%22%3A%22Orthotropic%20Elastic%20material%20Definition%20%3Cspan%20style%3D%5C%22float%3A%20right%3B%5C%22%3E%3C%2Fspan%3E%22%7D%2C%7B%22list-content%22%3A%22How%20to%20define%20Functional%20Loading%3Cspan%20style%3D%5C%22float%3A%20right%3B%5C%22%3E%3C%2Fspan%3E%22%7D%2C%7B%22list-content%22%3A%22how%20to%20create%20local%20coordinate%3Cspan%20style%3D%5C%22float%3A%20right%3B%5C%22%3E%3C%2Fspan%3E%22%7D%5D” icon_openiconic=”vc-oi vc-oi-ok” icons_color=”eyJwYXJhbV90eXBlIjoid29vZG1hcnRfY29sb3JwaWNrZXIiLCJjc3NfYXJncyI6eyJjb2xvciI6WyIgLmxpc3QtaWNvbiJdfSwic2VsZWN0b3JfaWQiOiI2MjBhNmJhZjMyY2Q3IiwiZGF0YSI6eyJkZXNrdG9wIjoiI2Y1ODYzNCJ9fQ==” css=”.vc_custom_1644850297659{padding-left: 5px !important;}”]
  • 이 강의는 FEM 시뮬레이션 튜토리얼 패키지에서 가장 중요한 강의 중 하나입니다. 이 Abaqus 과정 강의에서는 명시적 솔버와 표준 솔버에 대해 자세히 다룹니다. 이 FEA 교육의 첫 번째 단계에서는 솔버의 성능을 고려하여 각 예제에 적합한 솔버를 선택하는 방법을 설명합니다.
  • 두 솔버의 주요 차이점은 다양한 유형의 문제를 해결하는 방식과 필드 요소 해석 유형, 접촉 방식, 해석 방법 등에 대해 설명합니다. 다음 단계에서는 두 솔버의 메시 크기가 해석 속도에 미치는 영향을 분석합니다.
  • 간단한 문제를 표준 솔버와 명시적 솔버, 두 가지 솔버를 사용하여 풀이 과정을 완벽하게 설명하려고 시도했습니다. 따라서 이 두 솔버의 기능을 완벽하게 이해하실 수 있을 것입니다.
  • 워크숍에서 명시적 솔버를 사용하여 심층 드로잉 해석을 수행합니다. 이 워크숍에서는 강체 및 관련 지점, 실험실에서 추출한 단순 인장 응력 정보를 소프트웨어 입력에 활용하는 방법, Axsim 요소 및 관련 지점, 접촉 정의, 조립, 소성 정의 등의 다양한 내용을 다룹니다.

 FEA 교육

[woodmart_list icon_library=”openiconic” woodmart_css_id=”620ca31538658″ list=”%5B%7B%22list-content%22%3A%22Where%20Explicit%20Analysis%20is%20used%3Cspan%20style%3D%5C%22float%3A%20right%3B%5C%22%3E%3C%2Fspan%3E%5Cn%22%7D%2C%7B%22list-content%22%3A%22Stability%20definition%20%20for%20Explicit%20Method%3Cspan%20style%3D%5C%22float%3A%20right%3B%5C%22%3E%3C%2Fspan%3E%22%7D%2C%7B%22list-content%22%3A%22Stability%20limit%20calculation%3Cspan%20style%3D%5C%22float%3A%20right%3B%5C%22%3E%3C%2Fspan%3E%22%7D%2C%7B%22list-content%22%3A%22Example%20for%20stability%20limit%20calculation%20%3Cspan%20style%3D%5C%22float%3A%20right%3B%5C%22%3E%3C%2Fspan%3E%22%7D%2C%7B%22list-content%22%3A%22Speeding%20up%20a%20Quasi%20static%20Explicit%20Analysis%3Cspan%20style%3D%5C%22float%3A%20right%3B%5C%22%3E%3C%2Fspan%3E%22%7D%2C%7B%22list-content%22%3A%22Load%20Rate%20Scaling%3Cspan%20style%3D%5C%22float%3A%20right%3B%5C%22%3E%3C%2Fspan%3E%22%7D%2C%7B%22list-content%22%3A%22Smooth%20Amplitude%20Curves%20%3Cspan%20style%3D%5C%22float%3A%20right%3B%5C%22%3E%3C%2Fspan%3E%22%7D%2C%7B%22list-content%22%3A%22Mass%20Scaling%20%3Cspan%20style%3D%5C%22float%3A%20right%3B%5C%22%3E%3C%2Fspan%3E%22%7D%2C%7B%22list-content%22%3A%22Mass%20VS.%20Load%20Rate%20Scaling%3Cspan%20style%3D%5C%22float%3A%20right%3B%5C%22%3E%3C%2Fspan%3E%22%7D%2C%7B%22list-content%22%3A%22Energy%20Balance%3Cspan%20style%3D%5C%22float%3A%20right%3B%5C%22%3E%3C%2Fspan%3E%22%7D%2C%7B%22list-content%22%3A%22Using%20load%20rate%20scaling%20to%20increase%20time%20of%20computation%3Cspan%20style%3D%5C%22float%3A%20right%3B%5C%22%3E%3C%2Fspan%3E%22%7D%2C%7B%22list-content%22%3A%22Using%20Mass%20scaling%20to%20increase%20time%20of%20computation%3Cspan%20style%3D%5C%22float%3A%20right%3B%5C%22%3E%3C%2Fspan%3E%22%7D%2C%7B%22list-content%22%3A%22Checking%20proper%20load%20rate%20scaling%2Fmass%20scaling%20to%20get%20right%20result%3Cspan%20style%3D%5C%22float%3A%20right%3B%5C%22%3E%3C%2Fspan%3E%22%7D%2C%7B%22list-content%22%3A%22Discrete%20rigid%20simulation%20and%20usage%20conditions%20%3Cspan%20style%3D%5C%22float%3A%20right%3B%5C%22%3E%3C%2Fspan%3E%22%7D%2C%7B%22list-content%22%3A%22Plot%20combined%20curve(Load%20vs%20displacement%20for%20punch)%20%3Cspan%20style%3D%5C%22float%3A%20right%3B%5C%22%3E%3C%2Fspan%3E%22%7D%2C%7B%22list-content%22%3A%22Plane%20strain%20simulation%20and%20condition%20usages%20%3Cspan%20style%3D%5C%22float%3A%20right%3B%5C%22%3E%3C%2Fspan%3E%22%7D%2C%7B%22list-content%22%3A%22How%20to%20visualize%20axisymmetric%20element%20problem%20to%203D%20%3Cspan%20style%3D%5C%22float%3A%20right%3B%5C%22%3E%3C%2Fspan%3E%22%7D%2C%7B%22list-content%22%3A%22How%20to%20visualize%20Plane%20strain%20element%20problem%20to%203D%20%3Cspan%20style%3D%5C%22float%3A%20right%3B%5C%22%3E%3C%2Fspan%3E%22%7D%2C%7B%22list-content%22%3A%22How%20to%20use%20DOF%20monitor%3Cspan%20style%3D%5C%22float%3A%20right%3B%5C%22%3E%3C%2Fspan%3E%22%7D%2C%7B%22list-content%22%3A%22View%20results%20at%20the%20same%20intervals%3Cspan%20style%3D%5C%22float%3A%20right%3B%5C%22%3E%3C%2Fspan%3E%22%7D%2C%7B%22list-content%22%3A%22View%20specific%20result%20in%20some%20node%20sets%3Cspan%20style%3D%5C%22float%3A%20right%3B%5C%22%3E%3C%2Fspan%3E%22%7D%2C%7B%22list-content%22%3A%22How%20to%20plot%20ALLKE)%2C%20external%20work%20(ALLWK)%2C%20internal%20energy(ALLIE)%2C%20and%20total%20energy%20(ETOTAL)%3Cspan%20style%3D%5C%22float%3A%20right%3B%5C%22%3E%3C%2Fspan%3E%22%7D%5D” icon_openiconic=”vc-oi vc-oi-ok” icons_color=”eyJwYXJhbV90eXBlIjoid29vZG1hcnRfY29sb3JwaWNrZXIiLCJjc3NfYXJncyI6eyJjb2xvciI6WyIgLmxpc3QtaWNvbiJdfSwic2VsZWN0b3JfaWQiOiI2MjBjYTMxNTM4NjU4IiwiZGF0YSI6eyJkZXNrdG9wIjoiI2Y1ODYzNCJ9fQ==” css=”.vc_custom_1644996886769{padding-left: 5px !important;}”]
  • 이 강의에서는 명시적 솔버에 대한 매우 중요한 팁을 학습합니다. 첫 번째 단계에서는 동적 명시적 솔버를 통해 수행되는 다양한 유형의 해석을 설명합니다. 또한, 안정된 시간 증분 개념과 계산 방법을 예제를 통해 자세하고 정확하게 설명합니다.
  • 일부 문제에서는 질량 스케일링 및 하중율 스케일링과 같은 다양한 기법을 사용하여 해석 속도를 높일 수 있습니다. 이 두 기법에 대해 자세히 설명합니다. 또한, 이 두 기법에서 사용할 최적값을 계산하는 방법에 대한 몇 가지 팁을 제공합니다. 마지막으로 에너지 균형과 준정적(동적 상태 대비) 상태로 문제를 유지하는 방법에 대한 몇 가지 요점을 설명합니다.
  • 첫 번째 워크숍에서는 심부 드로잉 해석에 필요한 최적 시간을 계산하고 적용합니다. 본 해석에서는 질량 스케일링과 속도 스케일링과 같은 해석 속도 향상 방법 두 가지를 연구합니다. 
  • 두 번째 워크숍에서는 평면 변형률 요소를 사용하고, 해석 속도를 높이는 방법을 살펴봅니다. 또한, 롤링 선반을 따라 두께를 줄이기 위한 롤링 모델링 팁을 제시합니다. 마지막으로 에너지 평형을 점검하여 동적 변형을 방지합니다. 이 Abaqus 전체 과정에 대한 설명이 지루하지 않았기를 바랍니다. 

FEA 교육 | FEA 시뮬레이션

[woodmart_list icon_library=”openiconic” woodmart_css_id=”620cbfc40fbe9″ list=”%5B%7B%22list-content%22%3A%22Procedures%20Types%20in%20ABAQUS%20%3Cspan%20style%3D%5C%22float%3A%20right%3B%5C%22%3E%3C%2Fspan%3E%5Cn%22%7D%2C%7B%22list-content%22%3A%22General%20vs%20Linear%20Procedures%3Cspan%20style%3D%5C%22float%3A%20right%3B%5C%22%3E%3C%2Fspan%3E%22%7D%2C%7B%22list-content%22%3A%22Linear%20Perturbation%3Cspan%20style%3D%5C%22float%3A%20right%3B%5C%22%3E%3C%2Fspan%3E%22%7D%2C%7B%22list-content%22%3A%22Frequency%20Analysis%3Cspan%20style%3D%5C%22float%3A%20right%3B%5C%22%3E%3C%2Fspan%3E%22%7D%2C%7B%22list-content%22%3A%22Natural%20Frequencies%20and%20Mode%20Shapes%3Cspan%20style%3D%5C%22float%3A%20right%3B%5C%22%3E%3C%2Fspan%3E%22%7D%2C%7B%22list-content%22%3A%22Simple%20Example%20for%20Natural%20Frequencies%20%3AMass-spring%20system%3Cspan%20style%3D%5C%22float%3A%20right%3B%5C%22%3E%3C%2Fspan%3E%22%7D%2C%7B%22list-content%22%3A%22Natural%20Freq.%20in%20Real%20Structures%3Cspan%20style%3D%5C%22float%3A%20right%3B%5C%22%3E%3C%2Fspan%3E%22%7D%2C%7B%22list-content%22%3A%22Eigenvalue%20Extraction%20Methods(Natural%20Frequencies)%3Cspan%20style%3D%5C%22float%3A%20right%3B%5C%22%3E%3C%2Fspan%3E%22%7D%2C%7B%22list-content%22%3A%22Buckling%20Analysis%3Cspan%20style%3D%5C%22float%3A%20right%3B%5C%22%3E%3C%2Fspan%3E%22%7D%2C%7B%22list-content%22%3A%22Stiff%20Structures%3Cspan%20style%3D%5C%22float%3A%20right%3B%5C%22%3E%3C%2Fspan%3E%22%7D%2C%7B%22list-content%22%3A%22Buckling%20of%20Euler%20column%3Cspan%20style%3D%5C%22float%3A%20right%3B%5C%22%3E%3C%2Fspan%3E%22%7D%2C%7B%22list-content%22%3A%22How%20FEM%20software%20solve%20Eigenvalue%20buckling%20problem%3Cspan%20style%3D%5C%22float%3A%20right%3B%5C%22%3E%3C%2Fspan%3E%22%7D%2C%7B%22list-content%22%3A%22Eigenvalue%20Extraction%20Method(Buckling)%3Cspan%20style%3D%5C%22float%3A%20right%3B%5C%22%3E%3C%2Fspan%3E%22%7D%2C%7B%22list-content%22%3A%22Finding%20optimum%20time%20period%20for%20quasi%20static%20problem%20with%20natural%20frequency%20problem%3Cspan%20style%3D%5C%22float%3A%20right%3B%5C%22%3E%3C%2Fspan%3E%22%7D%2C%7B%22list-content%22%3A%22Viewing%20frequency%20mode%20shapes%20and%20natural%20frequency%20calculation%3Cspan%20style%3D%5C%22float%3A%20right%3B%5C%22%3E%3C%2Fspan%3E%22%7D%2C%7B%22list-content%22%3A%22Viewing%20buckling%20mode%20shapes%20and%20critical%20load%3Cspan%20style%3D%5C%22float%3A%20right%3B%5C%22%3E%3C%2Fspan%3E%22%7D%2C%7B%22list-content%22%3A%22Frequency%20analysis%20on%20a%20preloaded%20structure.%3Cspan%20style%3D%5C%22float%3A%20right%3B%5C%22%3E%3C%2Fspan%3E%22%7D%2C%7B%22list-content%22%3A%22Moment%20of%20inertia%20calculation%3Cspan%20style%3D%5C%22float%3A%20right%3B%5C%22%3E%3C%2Fspan%3E%22%7D%2C%7B%22list-content%22%3A%22Different%20ways%20to%20take%20a%20picture%20from%20viewport%3Cspan%20style%3D%5C%22float%3A%20right%3B%5C%22%3E%3C%2Fspan%3E%22%7D%2C%7B%22list-content%22%3A%22How%20to%20see%20node%20and%20element%20numbers%20is%20different%20modulus%3Cspan%20style%3D%5C%22float%3A%20right%3B%5C%22%3E%3C%2Fspan%3E%22%7D%2C%7B%22list-content%22%3A%22How%20to%20see%20thickness%20direction%20in%20shell%20model%3Cspan%20style%3D%5C%22float%3A%20right%3B%5C%22%3E%3C%2Fspan%3E%22%7D%5D” icon_openiconic=”vc-oi vc-oi-ok” icons_color=”eyJwYXJhbV90eXBlIjoid29vZG1hcnRfY29sb3JwaWNrZXIiLCJjc3NfYXJncyI6eyJjb2xvciI6WyIgLmxpc3QtaWNvbiJdfSwic2VsZWN0b3JfaWQiOiI2MjBjYmZjNDBmYmU5IiwiZGF0YSI6eyJkZXNrdG9wIjoiI2Y1ODYzNCJ9fQ==” css=”.vc_custom_1645003029688{padding-left: 5px !important;}”]
  • 이 강의에서는 유한요소해석(FEM) 시뮬레이션에서 선형 해석과 비선형 해석을 비교합니다. 먼저, 고유 진동수 해석과 관련 공식을 단계별로 설명하여 답을 구합니다. 또한, 고유 진동수 해석의 영향, 해석 기능 및 해석 속도에 대해서도 설명합니다. 다음 단계에서는 좌굴 해석, 해석의 적용 및 다른 공정에 미치는 영향을 소개합니다.
  • 유한요소해석(FEA) 시뮬레이션에서 좌굴 과정을 이해하기 위해 오일러 보를 연구하고, 미분방정식을 풀어 좌굴 하중을 계산합니다. 본 연구에서는 좌굴 방정식의 일반적인 풀이법, 유한요소 소프트웨어에서의 활용법, 그리고 다양한 구조물의 좌굴 하중을 처리하는 소프트웨어의 다양한 풀이 기법과 기능을 살펴봅니다.
  • 첫 번째 워크숍에서는 전단 하중을 받는 축소 보 문제를 푸는 데 필요한 최적 시간을 계산합니다. 또한 좌굴 하중, 모드 형상, 관성 모멘트를 추출하는 방법을 학습합니다. 또한, Riks 방법을 사용하여 절점 번호와 요소를 나타내는 모델을 생성하거나 결과를 얻는 방법을 배우고, 좌굴 후 거동을 분석합니다. 이 과정에서는 좌굴 후 해석에서 좌굴 해석을 사용하여 손상을 정의하는 데 필요한 사항을 설명합니다. 다음 워크숍에서는 외부 유체 압력을 받는 튜브의 좌굴을 분석합니다. (유한요소해석 교육)
  • 세 번째 워크숍에서는 물 이동관의 고유 진동수를 처리하여 관 내에서 진동이 발생할 경우 공진 현상이나 문제가 발생할 주파수를 파악합니다. 이는 인위적인 외부 힘이나 지진과 같은 자연력에 의해 적용될 수 있습니다.
[woodmart_list icon_library=”openiconic” woodmart_css_id=”620cc4f56f246″ list=”%5B%7B%22list-content%22%3A%22Types%20of%20heat%20transfer%20analysis%3Cspan%20style%3D%5C%22float%3A%20right%3B%5C%22%3E%3C%2Fspan%3E%5Cn%22%7D%2C%7B%22list-content%22%3A%22What%20is%20uncoupled%20heat%20transfer%20analysis%20and%20how%20to%20use%20it%3Cspan%20style%3D%5C%22float%3A%20right%3B%5C%22%3E%3C%2Fspan%3E%22%7D%2C%7B%22list-content%22%3A%22Heat%20transfer%20modes%20(convection%2C%20conduction%2C%20radiation)%3Cspan%20style%3D%5C%22float%3A%20right%3B%5C%22%3E%3C%2Fspan%3E%22%7D%2C%7B%22list-content%22%3A%22Transient%20vs%20steady%20state%20analysis%3Cspan%20style%3D%5C%22float%3A%20right%3B%5C%22%3E%3C%2Fspan%3E%22%7D%2C%7B%22list-content%22%3A%22What%20is%20Sequentially%20coupled%20thermal-stress%20analysis%20and%20how%20to%20use%20it%3Cspan%20style%3D%5C%22float%3A%20right%3B%5C%22%3E%3C%2Fspan%3E%22%7D%2C%7B%22list-content%22%3A%22What%20is%20Fully%20coupled%20thermal-stress%20analysis%20and%20how%20to%20use%20it%20%3Cspan%20style%3D%5C%22float%3A%20right%3B%5C%22%3E%3C%2Fspan%3E%22%7D%2C%7B%22list-content%22%3A%22What%20is%20Adaptive%20meshing%20and%20its%20advantages%3Cspan%20style%3D%5C%22float%3A%20right%3B%5C%22%3E%3C%2Fspan%3E%22%7D%2C%7B%22list-content%22%3A%22What%20is%20ALE%20Adaptive%20Meshing%20and%20its%20advantages%20%3Cspan%20style%3D%5C%22float%3A%20right%3B%5C%22%3E%3C%2Fspan%3E%22%7D%2C%7B%22list-content%22%3A%22What%20is%20Lagrangian%20method%20and%20its%20advantages%3Cspan%20style%3D%5C%22float%3A%20right%3B%5C%22%3E%3C%2Fspan%3E%22%7D%2C%7B%22list-content%22%3A%22Lagrangian%20Description%20%3Cspan%20style%3D%5C%22float%3A%20right%3B%5C%22%3E%3C%2Fspan%3E%22%7D%2C%7B%22list-content%22%3A%22What%20is%20Eulerian%20method%20and%20its%20advantages%3Cspan%20style%3D%5C%22float%3A%20right%3B%5C%22%3E%3C%2Fspan%3E%22%7D%2C%7B%22list-content%22%3A%22What%20is%20adiabatic%20analysis%20and%20how%20to%20use%20it%3Cspan%20style%3D%5C%22float%3A%20right%3B%5C%22%3E%3C%2Fspan%3E%22%7D%2C%7B%22list-content%22%3A%22Adiabatic%20formulas%3Cspan%20style%3D%5C%22float%3A%20right%3B%5C%22%3E%3C%2Fspan%3E%22%7D%2C%7B%22list-content%22%3A%22Required%20material%20inputs%20for%20uncoupled%20steady%20state%3Cspan%20style%3D%5C%22float%3A%20right%3B%5C%22%3E%3C%2Fspan%3E%22%7D%2C%7B%22list-content%22%3A%22Required%20material%20inputs%20for%20uncoupled%20steady%20state%20%3Cspan%20style%3D%5C%22float%3A%20right%3B%5C%22%3E%3C%2Fspan%3E%22%7D%2C%7B%22list-content%22%3A%22Required%20step%20settings%20for%20uncoupled%20steady%20state%3Cspan%20style%3D%5C%22float%3A%20right%3B%5C%22%3E%3C%2Fspan%3E%22%7D%2C%7B%22list-content%22%3A%22Required%20interaction%20settings%20for%20uncoupled%20steady%20state%20%3Cspan%20style%3D%5C%22float%3A%20right%3B%5C%22%3E%3C%2Fspan%3E%22%7D%2C%7B%22list-content%22%3A%22Required%20load%20settings%20for%20uncoupled%20steady%20state%20%3Cspan%20style%3D%5C%22float%3A%20right%3B%5C%22%3E%3C%2Fspan%3E%22%7D%2C%7B%22list-content%22%3A%22Required%20material%20inputs%20for%20transient%20thermal%20analysis%3Cspan%20style%3D%5C%22float%3A%20right%3B%5C%22%3E%3C%2Fspan%3E%22%7D%2C%7B%22list-content%22%3A%22Apply%20different%20types%20of%20heat%20modes%3Cspan%20style%3D%5C%22float%3A%20right%3B%5C%22%3E%3C%2Fspan%3E%22%7D%2C%7B%22list-content%22%3A%22Required%20step%20settings%20for%20uncoupled%20heat%20transfer%3Cspan%20style%3D%5C%22float%3A%20right%3B%5C%22%3E%3C%2Fspan%3E%22%7D%2C%7B%22list-content%22%3A%22Results%20of%20transient%20vs%20steady%20state%3Cspan%20style%3D%5C%22float%3A%20right%3B%5C%22%3E%3C%2Fspan%3E%22%7D%2C%7B%22list-content%22%3A%22Required%20material%20inputs%20for%20sequentially%20coupled%20analysis%3Cspan%20style%3D%5C%22float%3A%20right%3B%5C%22%3E%3C%2Fspan%3E%22%7D%2C%7B%22list-content%22%3A%22How%20to%20import%20result%20of%20heat%20transfer%20analysis%20as%20an%20input%20of%20stress%20analysis%20inputs%20for%20sequentially%20coupled%20analysis%3Cspan%20style%3D%5C%22float%3A%20right%3B%5C%22%3E%3C%2Fspan%3E%22%7D%2C%7B%22list-content%22%3A%22Settings%20of%20modulus%20in%20stress%20analysis%3Cspan%20style%3D%5C%22float%3A%20right%3B%5C%22%3E%3C%2Fspan%3E%22%7D%2C%7B%22list-content%22%3A%22How%20to%20create%20rigid%20spline%20geometry%3Cspan%20style%3D%5C%22float%3A%20right%3B%5C%22%3E%3C%2Fspan%3E%22%7D%2C%7B%22list-content%22%3A%22Usage%20of%20axisymmetric%20element%20in%20forge%20analysis%3Cspan%20style%3D%5C%22float%3A%20right%3B%5C%22%3E%3C%2Fspan%3E%22%7D%2C%7B%22list-content%22%3A%22Definition%20of%20strain-rate%20and%20temperature%20dependent%20material%3Cspan%20style%3D%5C%22float%3A%20right%3B%5C%22%3E%3C%2Fspan%3E%22%7D%2C%7B%22list-content%22%3A%22Required%20material%20inputs%20for%20fully%20%20coupled%20analysis%20for%20deformable%20parts%3Cspan%20style%3D%5C%22float%3A%20right%3B%5C%22%3E%3C%2Fspan%3E%22%7D%2C%7B%22list-content%22%3A%22Required%20material%20inputs%20for%20fully%20%20coupled%20analysis%20for%20rigid%20parts%3Cspan%20style%3D%5C%22float%3A%20right%3B%5C%22%3E%3C%2Fspan%3E%22%7D%2C%7B%22list-content%22%3A%22Required%20interaction%20settings%20for%20fully%20%20coupled%20analysis%20%3Cspan%20style%3D%5C%22float%3A%20right%3B%5C%22%3E%3C%2Fspan%3E%22%7D%2C%7B%22list-content%22%3A%22What%20is%20thermal%20conductance%20and%20how%20to%20apply%20it%3Cspan%20style%3D%5C%22float%3A%20right%3B%5C%22%3E%3C%2Fspan%3E%22%7D%2C%7B%22list-content%22%3A%22Required%20inputs%20in%20edit%20attribute%20for%20fully%20coupled%20analysis%3Cspan%20style%3D%5C%22float%3A%20right%3B%5C%22%3E%3C%2Fspan%3E%22%7D%2C%7B%22list-content%22%3A%22Required%20outputs%20in%20step%20module%20for%20fully%20coupled%20analysis%3Cspan%20style%3D%5C%22float%3A%20right%3B%5C%22%3E%3C%2Fspan%3E%22%7D%2C%7B%22list-content%22%3A%22Abaqus%20Settings%20for%20ALE%20Adaptive%20meshing%3Cspan%20style%3D%5C%22float%3A%20right%3B%5C%22%3E%3C%2Fspan%3E%22%7D%2C%7B%22list-content%22%3A%22How%20to%20show%20Axisymmetric%20model%20as%20a%20full%20model%3Cspan%20style%3D%5C%22float%3A%20right%3B%5C%22%3E%3C%2Fspan%3E%22%7D%2C%7B%22list-content%22%3A%22What%20is%20Johnson-Cook%20plasticity%20and%20its%20formula%3Cspan%20style%3D%5C%22float%3A%20right%3B%5C%22%3E%3C%2Fspan%3E%22%7D%2C%7B%22list-content%22%3A%22How%20to%20define%20Johnson-Cook%20plasticity%3Cspan%20style%3D%5C%22float%3A%20right%3B%5C%22%3E%3C%2Fspan%3E%22%7D%2C%7B%22list-content%22%3A%22How%20to%20calculate%20equivalent%20force%20during%20impact%3Cspan%20style%3D%5C%22float%3A%20right%3B%5C%22%3E%3C%2Fspan%3E%22%7D%2C%7B%22list-content%22%3A%22Plot%20velocity%20vs%20time%20of%20impactor%3Cspan%20style%3D%5C%22float%3A%20right%3B%5C%22%3E%3C%2Fspan%3E%22%7D%2C%7B%22list-content%22%3A%22Effect%20of%20time%20period%20in%20impact%20analysis%3Cspan%20style%3D%5C%22float%3A%20right%3B%5C%22%3E%3C%2Fspan%3E%22%7D%5D” icon_openiconic=”vc-oi vc-oi-ok” icons_color=”eyJwYXJhbV90eXBlIjoid29vZG1hcnRfY29sb3JwaWNrZXIiLCJjc3NfYXJncyI6eyJjb2xvciI6WyIgLmxpc3QtaWNvbiJdfSwic2VsZWN0b3JfaWQiOiI2MjBjYzRmNTZmMjQ2IiwiZGF0YSI6eyJkZXNrdG9wIjoiI2Y1ODYzNCJ9fQ==” css=”.vc_custom_1645004613728{padding-left: 5px !important;}”]
  • 우주에서 가장 흔한 현상 중 하나는 열전달입니다. 열전달은 기계적 특성의 변화를 일으킬 수 있습니다. 열전달 해석은 일관 해석과 과도 해석의 두 가지 유형으로 나눌 수 있습니다. 이 강의에서는 이 두 가지 해석의 설정과 유용한 팁을 예제와 함께 살펴봅니다.
  • 다음으로, 열전달 해석의 영향을 받는 기계적 해석을 검토합니다. 경우에 따라 이러한 해석(기계적/열적)은 동시에 연계되어야 하며, 경우에 따라 연속적으로 수행될 수 있습니다. 각 해석에 대해 문제 유형 및 활용 방법을 파악하는 데 필요한 핵심 팁과 항목을 관련 사례와 함께 제시합니다. 연계 과정에서는 열간 단조 유한요소해석(FEA) 시뮬레이션을 워크숍 형태로 진행합니다.
  • 일부 시뮬레이션에서는 요소에 과도한 왜곡이 발생합니다. 이 경우 ALE 기법을 사용해야 합니다. 이 기법은 전체적으로 설명되고, 라그랑지안 및 오일러안 기법과의 차이점도 제시됩니다. 이 기법은 열간 단조 공정에 사용되며, 열전달, 복사, 대류, 전도도, 마찰로 인한 열 생성, 소성 가공으로 인한 열 생성, 그리고 탄성과 소성의 열 의존성 등 다양한 해석 방법을 포함하는 전체적인 참고 사항과 단계가 설명됩니다.
  • 두 번째 워크숍에서는 충격 해석을 수행합니다. 이 과정에서는 열이 물질 전체에 분산될 시간이 거의 없으므로, 단열이라는 또 다른 유형의 열전달에 대해 연구합니다. 이러한 유형의 열전달과 그 응용 분야에 대해 자세히 논의합니다. 이 과정에서 사용된 재료는 온도와 변형률 속도에 따라 기계적 특성이 결정되는 존슨 쿡의 법칙을 사용했습니다.
  • 이 모델에 대한 자세한 설명과 FEM 시뮬레이션 소프트웨어에서 구현하는 단계를 설명합니다. 이 예시의 다른 내용으로는 충격 시간, 총알의 시간 차트에 따른 속도 변화, 힘, 그리고 여러 요소와 노드의 합성 토크 그래프를 조사하는 내용이 있습니다. (FEA 교육)
[woodmart_list icon_library=”openiconic” woodmart_css_id=”620a5de0799b6″ list=”%5B%7B%22list-content%22%3A%22What%20is%20the%20definition%20of%20damage%20and%20its%20applications%3F%3Cspan%20style%3D%5C%22float%3A%20right%3B%5C%22%3E%3C%2Fspan%3E%5Cn%22%7D%2C%7B%22list-content%22%3A%22What%20is%20the%20difference%20between%20microscopic%20and%20macroscopic%20damage%20in%20composite%20materials%3F%3Cspan%20style%3D%5C%22float%3A%20right%3B%5C%22%3E%3C%2Fspan%3E%22%7D%2C%7B%22list-content%22%3A%22What%20is%20the%20various%20theories%20to%20simulate%20initiation%20damage%20in%20composite%20material%20structures%3F%3Cspan%20style%3D%5C%22float%3A%20right%3B%5C%22%3E%3C%2Fspan%3E%22%7D%2C%7B%22list-content%22%3A%22What%20is%20the%20available%20theory%20to%20simulate%20progressive%20damage%20of%20composite%20material%20structures%3F%3Cspan%20style%3D%5C%22float%3A%20right%3B%5C%22%3E%3C%2Fspan%3E%22%7D%2C%7B%22list-content%22%3A%22What%20is%20the%20elements%20limitations%20to%20simulate%20progressive%20damage%20of%20composite%20material%20structures%3F%3Cspan%20style%3D%5C%22float%3A%20right%3B%5C%22%3E%3C%2Fspan%3E%22%7D%2C%7B%22list-content%22%3A%22What%20is%20Fully%20coupled%20thermal-stress%20analysis%20and%20how%20to%20use%20it%20%20%3Cspan%20style%3D%5C%22float%3A%20right%3B%5C%22%3E%3C%2Fspan%3E%22%7D%2C%7B%22list-content%22%3A%22Which%20ways%20are%20available%20to%20add%20criterion%20to%20simulate%20composite%20damage%3F%3Cspan%20style%3D%5C%22float%3A%20right%3B%5C%22%3E%3C%2Fspan%3E%22%7D%2C%7B%22list-content%22%3A%22How%20to%20use%20composite%20damage%20results%20as%20an%20initiation%20condition%20of%20other%20simulation%3F%3Cspan%20style%3D%5C%22float%3A%20right%3B%5C%22%3E%3C%2Fspan%3E%22%7D%2C%7B%22list-content%22%3A%22Defining%20Elastic%20property%20by%20engineering%20constant%20selection%3Cspan%20style%3D%5C%22float%3A%20right%3B%5C%22%3E%3C%2Fspan%3E%22%7D%2C%7B%22list-content%22%3A%22Defining%20failure%20criterion%20parameters%20for%20HASHIN%3Cspan%20style%3D%5C%22float%3A%20right%3B%5C%22%3E%3C%2Fspan%3E%22%7D%2C%7B%22list-content%22%3A%22Setting%20in%20field%20output%20to%20get%20required%20results%3Cspan%20style%3D%5C%22float%3A%20right%3B%5C%22%3E%3C%2Fspan%3E%22%7D%2C%7B%22list-content%22%3A%22View%20results%20in%20layers%20for%20fiber%20and%20matrix%20separately%3Cspan%20style%3D%5C%22float%3A%20right%3B%5C%22%3E%3C%2Fspan%3E%22%7D%2C%7B%22list-content%22%3A%22Recommended%20package%20to%20learn%20Composite%20damage%20simulation%20deeply%3Cspan%20style%3D%5C%22float%3A%20right%3B%5C%22%3E%3C%2Fspan%3E%22%7D%5D” icon_openiconic=”vc-oi vc-oi-ok” icons_color=”eyJwYXJhbV90eXBlIjoid29vZG1hcnRfY29sb3JwaWNrZXIiLCJjc3NfYXJncyI6eyJjb2xvciI6WyIgLmxpc3QtaWNvbiJdfSwic2VsZWN0b3JfaWQiOiI2MjBhNWRlMDc5OWI2IiwiZGF0YSI6eyJkZXNrdG9wIjoiI2Y1ODYzNCJ9fQ==” css=”.vc_custom_1644846848224{padding-left: 5px !important;}”]
  • 복합재 손상 시뮬레이션 패키지의 일부인 이 강의에서는 먼저 손상의 정의와 그 응용에 대해 설명합니다. 이어서, 미시적 손상과 거시적 손상의 차이점을 살펴보겠습니다. 복합재의 손상 시작 규모와 손상 지속 기간을 살펴봅니다. 본 강의에서는 복합재의 유한요소해석(FEA) 교육 또는 유한요소해석(FEM) 시뮬레이션에 대한 전반적인 내용을 다룹니다. 
  • 이번 워크숍에서는 불균일 하중을 받는 구멍이 있는 평면에서 하신 스케일에 따른 손상의 시작과 지속을 알아봅니다. 또한, 복합 탄성 특성 정의, 하신 스케일 시작에 필요한 매개변수, 그리고 결과를 관찰하고 섬유와 매트릭스의 층별 결과를 독립적으로 확인하기 위한 현장 출력 설정 등의 내용을 다룹니다.
  • 패키지에서 복합재 모델링 및 재료 손상 조사에 대한 다양한 사례를 확인할 수 있습니다. 3D 요소 손상, 피로 해석, 그리고 이러한 재료에 대한 완전한 패키지 등 복합재 관련 패키지도 제공됩니다.

사용자들은 이러한 질문을 합니다.

소셜 미디어에서 사용자들은 Abaqus에 관한 일반적이고 기본적인 질문을 올렸고, 우리는 그중 몇 가지에 답했습니다. 아래에서 확인하실 수 있습니다.

나. 최대 모멘트 용량을 구하세요

큐: Abaqus에서 콘크리트로 둘러싸인 합성 기둥을 모델링했습니다. 기둥에 이축 굽힘을 적용했습니다. 두 축 모두 편심 하중을 받습니다. Abaqus를 사용하여 좌굴 하중을 계산합니다. 이제 기둥의 최대 모멘트 내력을 구해야 합니다. Abaqus에서 극한 모멘트 내력을 어떻게 구할 수 있을까요?

에이: 안녕하세요,

시각화 모듈로 이동하세요. 도구 메뉴에서 자유물체절단을 선택하세요. 이 옵션을 사용하면 원하는 단면과 요소를 선택하여 모멘트와 힘을 확인할 수 있습니다. 또한, 다음 링크를 참조하는 것이 좋습니다.

초보자를 위한 아바쿠스 과정 | 에프이엠 시뮬레이션 튜토리얼

2. 모멘트 곡률도

큐: FRP BEAM의 모멘트 곡률 선도를 그릴 수 있는 방법/소프트웨어를 추천해 주세요. Abaqus에서 작업 중인데 그릴 수가 없습니다.

에이: 안녕하세요,

먼저, 보의 한쪽 끝에 대한 기준점을 정의하고 모멘트를 정의한 후 다른 쪽 끝을 고정합니다. 단계 모듈의 필드 출력 요청에서 총 힘과 모멘트(TF) 변수를 선택합니다. 작업을 실행합니다. 모멘트-곡률 다이어그램을 그리려면 기준점의 TF와 UR3(UR 번호는 모멘트 방향에 따라 다름)을 그립니다. 그런 다음 "XY 데이터 작동"을 사용하여 두 플롯을 결합합니다.

이 설명이 도움이 되길 바랍니다. 또한, 더 자세한 내용은 다음 링크를 참조하세요. 초보자를 위한 아바쿠스 과정 | 에프이엠 시뮬레이션 튜토리얼

초보자를 위한 아바쿠스 과정 | 에프이엠 시뮬레이션 튜토리얼에 대한 13개 상품평

  1. Avatar of Madi Dehk

    마디 데크

    Abaqus 튜터로서, 저는 초보자를 위한 포괄적인 교육 패키지가 필요한데, 음절 기반이 좋은 선택인 것 같습니다.

  2. Avatar of David White

    데이비드 화이트

    시작하기에 깔끔하고 좋은 패키지인 것 같습니다. 웹에서 볼 수 있는 다른 튜토리얼과는 달리, 이 튜토리얼에는 시뮬레이션 영상의 이론에 대한 설명이 포함되어 있어 향후 분석에 매우 도움이 될 것입니다.

  3. Avatar of Dario Chávez

    다리오 차베스

    Abaqus 입문 교육이 이보다 더 좋을 거라고는 생각하지 않습니다. Abaqus에 대해 아무것도 몰랐지만, 이제는 오랫동안 Abaqus를 사용해 온 많은 사람들보다 더 많이 알고 있다고 생각합니다. 정말 감사합니다!

  4. Avatar of Lucas Rossi

    루카스 로시

    제가 본 주제들을 보면 Abaqus를 깊이 있게 배우고 Abaqus와 같은 소프트웨어의 다양한 표현식에 대한 개념을 이해할 수 있을 것 같습니다. 워크숍만 수강할 수 있는 방법이 있을까요?

  5. Avatar of Elias Wagner

    엘리아스 바그너

    ABAQUS를 배우기 위해 웹사이트, 비디오, 아니면 책을 찾고 있었어요. 그런데 이 패키지를 발견했을 때, ABAQUS를 배우고 싶은 사람이라면 누구든 이 패키지를 구매해서 끝내야 한다고 말씀드리고 싶어요. 앞으로 워크숍이 더 있을까요?

  6. Avatar of Igor Kovalenko

    이고르 코발렌코

    시작하기에 좋은 패키지 같네요. 그런데 저는 토목 기사인데, 이 패키지가 토목 기사에게도 적합할까요?

상품평 추가하기

강사들

0-아바쿠스-1-카이조수파트너

유로 256.0

얻다 무료 Access to More Than the Demo!